1.9 KiB
Hardware set up of Open Rowing Monitor on a Concept 2 RowErg
This guide explains how to set up Open Rowing Monitor for a Concept 2 RowErg. Please note that older Concept 2 models are NOT covered by this as the sensor on the flywheel has changed.
Hardware setup
After the software installation, basically all that's left to do is hook up your sensor to the Raspberry Pi. However, the signal from a Concept 2 RowErg is a 15 Volt sinoid, which would destroy the Raspberry Pi's 3.3 Volts circuits. To isolate the circuits, we add an optocoupler in an non-destructive way, by rerouting the signal. Below is the wiring schematic of the Al-Zard DST-1R4P-P:
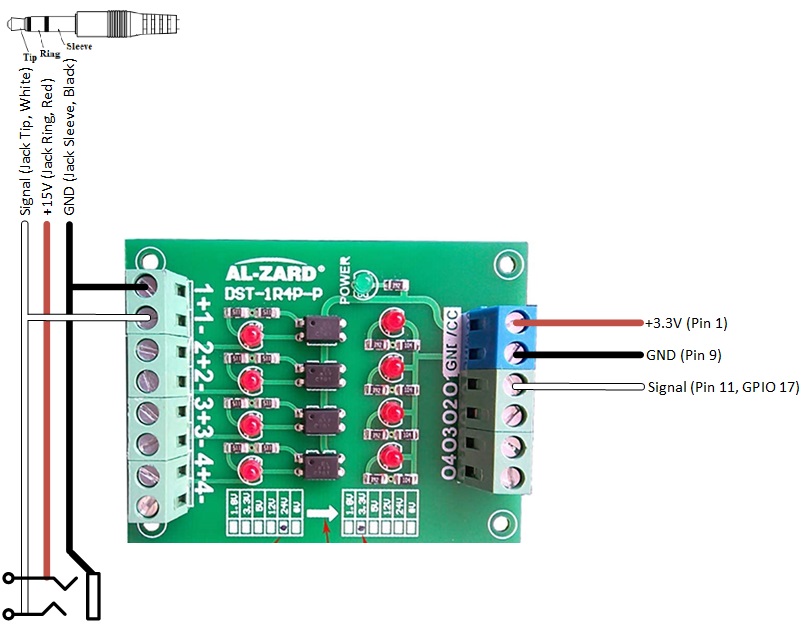 Optocoupler wiring to the Raspberry Pi
On the left side, both the jack-plug and the jack-bus are 2.5mm, allowing the PM5 jackplug to be inserted and looped through if needed (allowing ORM to work side-by-side of the PM5). On the right, the connections to the Raspberry Pi are made.
To get a stable reading you should add a pull-up resistor to that pin. I prefer to use the internal resistor of the Raspberry Pi to keep the wiring simple but of course you can also go with an external circuit.
The internal pull-up can be enabled as described here. So its as simple as adding the following to /boot/config.txt and then rebooting the device.
# configure GPIO 17 as input and enable the pull-up resistor
gpio=17=pu,ip
Rower Settings
You should now adjust the rower specific parameters in config/config.js to suit your rowing machine. For the Concept 2 RowErg, there is a set of predefined parameters ready to use. So it suffices to add
rowerSettings: Concept2_RowErg
to your config/config.js file. You can also look at config/default.config.js to see what other configuration parameters are available.