# KiBot (formerly KiPlot)

[](https://github.com/INTI-CMNB/KiBot/actions)
[](https://coveralls.io/github/INTI-CMNB/KiBot?branch=master)
[](https://pypi.org/project/kibot/)
**New on 0.10.0**:
- Makefile generation (for local use, avoiding to redo unneeded stuff)
- Compressed files generation (to gather deliverables)
- Import outputs from another project (i.e. gerber and drill recipe for a particular manufacturer)
- Multi-project consolidated BoMs
- Sortable HTML BoMs (choose any column)
## Index
* [Introduction](#introduction)
* [Configuration](#configuration)
* [The header](#the-header)
* [The *preflight* section](#the-preflight-section)
* [Supported *preflight* options](#supported-preflight-options)
* [More about *pcb_replace* and *sch_replace*](#more-about-pcb_replace-and-sch_replace)
* [Filtering DRC and ERC errors](#filtering-drc-and-erc-errors)
* [Default global options](#default-global-options)
* [Default *output* option](#default-output-option)
* [Default *dir* option](#default-dir-option)
* [Default *variant* option](#default-variant-option)
* [Output directory option](#output-directory-option)
* [Date format option](#date-format-option)
* [Filtering KiBot warnings](#filtering-kibot-warnings)
* [Filters and variants](#filters-and-variants)
* [Supported filters](#supported-filters)
* [Examples for filters](#examples-for-filters)
* [Built-in filters](#built-in-filters)
* [DNF and DNC internal keys](#dnf-and-dnc-internal-keys)
* [The *outputs* section](#the-outputs-section)
* [Specifying the layers](#specifying-the-layers)
* [Supported outputs](#supported-outputs)
* [Consolidating BoMs](#consolidating-boms)
* [Importing outputs from another file](#importing-outputs-from-another-file)
* [Using other output as base for a new one](#using-other-output-as-base-for-a-new-one)
* [Importing filters and variants from another file](#importing-filters-and-variants-from-another-file)
* [Usage](#usage)
* [Installation](#installation)
* [Usage for CI/CD](#usage-for-cicd)
* [Github Actions](#usage-of-github-actions)
* [Notes about Gerber format](#notes-about-gerber-format)
* [Notes about the position file](#notes-about-the-position-file)
* [Credits](#credits)
## Introduction
KiBot is a program which helps you to generate the fabrication and
documentation files for your KiCad projects easily, repeatable, and
most of all, scriptably. This means you can use a Makefile to export
your KiCad PCBs just as needed.
For example, it's common that you might want for each board rev:
* Check ERC/DRC one last time (using [KiCad Automation Scripts](https://github.com/INTI-CMNB/kicad-automation-scripts/))
* Gerbers, drills and drill maps for a fab in their favourite format
* Fab docs for the assembler, including the BoM (Bill of Materials), costs spreadsheet and board view
* Pick and place files
* PCB 3D model in STEP format
* PCB 3D render in PNG format
You want to do this in a one-touch way, and make sure everything you need to
do so is securely saved in version control, not on the back of an old
datasheet.
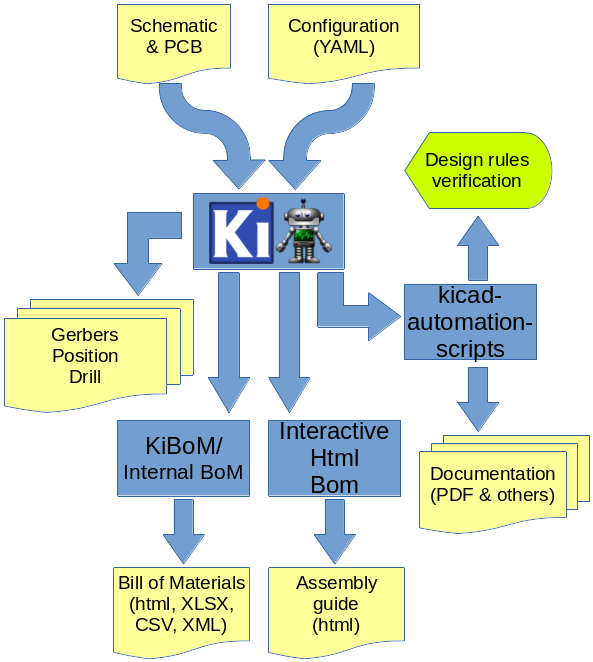
KiBot lets you do this. The following picture depicts the data flow:
If you want to see this concept applied to a real world project visit the [Spora CI/CD](https://github.com/INTI-CMNB/kicad-ci-test-spora) example.
## Configuration
KiBot uses a configuration file where you can specify what *outputs* to
generate. By default you'll generate all of them, but you can specify which
ones from the command line.
The configuration file should be named using the **.kibot.yaml** suffix,
i.e. *my_project.kibot.yaml*. The format used is [YAML](https://yaml.org/).
This is basically a text file with some structure.
This file can be compressed using *gzip* file format.
If you never used YAML read the following [explanation](https://github.com/INTI-CMNB/KiBot/blob/master/docs/KiPlotYAML.md).
Note that the explanation could be useful even if you know YAML.
### The header
All configuration files must start with:
```yaml
kibot:
version: 1
```
This tells to KiBot that this file is using version 1 of the format.
### The *preflight* section
This section is used to specify tasks that will be executed before generating any output.
#### @preflight@
Here is an example of a *preflight* section:
```yaml
preflight:
run_erc: true
update_xml: true
run_drc: true
check_zone_fills: true
ignore_unconnected: false
```
#### More about *pcb_replace* and *sch_replace*
These options are supposed to be used in a version control environment.
This is because, unlike other options, they modify the PCB and/or schematic and might damage them.
In a version control environment you can just roll-back the changes.
Don't be afraid, they make a back-up of the files and also tries to disable dangerous changes.
But should be used carefully. They are ideal for CI/CD environment where you don't actually commit any changes.
#### Filtering DRC and ERC errors
Sometimes KiCad reports DRC or ERC errors that you can't get rid off.
This could be just because you are part of a team including lazy people that doesn't want to take the extra effort to solve
some errors that aren't in fact errors, just small violations made on purpose. In this case you could exclude some known errors.
For this you must declare `filters` entry in the `preflight` section. Then you can add as many `filter` entries as you want.
Each filter entry has an optional description and defines to which error type is applied (`number`) and a regular expression
that the error must match to be ignored (`regex`). Like this:
```yaml
filters:
- filter: 'Optional filter description'
error: 'Error_type'
regex: 'Expression to match'
```
Here is a KiCad 5 example, suppose you are getting the following errors:
```
** Found 1 DRC errors **
ErrType(4): Track too close to pad
@(177.185 mm, 78.315 mm): Track 1.000 mm [Net-(C3-Pad1)] on F.Cu, length: 1.591 mm
@(177.185 mm, 80.715 mm): Pad 2 of C3 on F.Cu and others
** Found 1 unconnected pads **
ErrType(2): Unconnected items
@(177.185 mm, 73.965 mm): Pad 2 of C4 on F.Cu and others
@(177.185 mm, 80.715 mm): Pad 2 of C3 on F.Cu and others
```
And you want to ignore them. You can add the following filters:
```yaml
filters:
- filter: 'Ignore C3 pad 2 too close to anything'
error: '4'
regex: 'Pad 2 of C3'
- filter: 'Ignore unconnected pad 2 of C4'
error: '2'
regex: 'Pad 2 of C4'
```
If you need to match text from two different lines in the error message try using `(?s)TEXT(.*)TEXT_IN_OTHER_LINE`.
If you have two or more different options for a text to match try using `(OPTION1|OPTION2)`.
A complete Python regular expressions explanation is out of the scope of this manual. For a complete reference consult the [Python manual](https://docs.python.org/3/library/re.html).
KiCad 6 uses strings to differentiate errors, use them for the `error` field. To keep compatibility you can use the `number` or `error_number` options for KiCad 5.
**Important note**: this will create a file named *kibot_errors.filter* in the output directory.
### Default global options
The section `global` contains default global options that affects all the outputs.
Currently only a few option are supported.
#### Default *output* option
This option controls the default file name pattern used by all the outputs. This makes all the file names coherent.
You can always choose the file name for a particular output.
The pattern uses the following expansions:
- **%c** company from pcb/sch metadata.
- **%C`n`** comments line `n` from pcb/sch metadata.
- **%d** pcb/sch date from metadata if available, file modification date otherwise.
- **%D** date the script was started.
- **%f** original pcb/sch file name without extension.
- **%F** original pcb/sch file name without extension. Including the directory part of the name.
- **%g** the `file_id` of the global variant.
- **%G** the `name` of the global variant.
- **%i** a contextual ID, depends on the output type.
- **%I** an ID defined by the user for this output.
- **%p** pcb/sch title from pcb metadata.
- **%r** revision from pcb/sch metadata.
- **%T** time the script was started.
- **%x** a suitable extension for the output type.
- **%v** the `file_id` of the current variant, or the global variant if outside a variant scope.
- **%V** the `name` of the current variant, or the global variant if outside a variant scope.
They are compatible with the ones used by IBoM.
The default value for `global.output` is `%f-%i.%x`.
If you want to include the revision you could add the following definition:
```yaml
global:
output: '%f_rev_%r-%i.%x'
```
Note that the following patterns: **%c**, **%C`n`**, **%d**, **%f**, **%F**, **%p** and **%r** depends on the context.
If you use them for an output related to the PCB these values will be obtained from the PCB.
If you need to force the origin of the data you can use **%bX** for the PCB and **%sX** for the schematic, where
**X** is the pattern to expand.
#### Default *dir* option
The default `dir` value for any output is `.`. You can change it here.
Expansion patterns are allowed.
Note that you can use this value as a base for output's `dir` options. In this case the value defined in the `output` must start with `+`.
In this case the `+` is replaced by the default `dir` value defined here.
#### Default *variant* option
This option controls the default variant applied to all the outputs. Example:
```yaml
global:
variant: 'production'
```
#### Output directory option
The `out_dir` option can define the base outut directory. This is the same as the `-d`/`--out-dir` command line option.
Note that the command line option has precedence over it.
Expansion patterns are applied to this value, but you should avoid using patterns that expand according to the context, i.e. **%c**, **%d**, **%f**, **%F**, **%p** and **%r**.
The behavior of these patterns isn't fully defined in this case and the results may change in the future.
#### Date format option
* The **%d**, **%sd** and **%bd** patterns use the date and time from the PCB and schematic.
When abscent they use the file timestamp, and the `date_time_format` global option controls the format used.
When available, and in ISO format, the `date_format` controls the format used.
You can disable this reformatting assigning `false` to the `date_reformat` option.
* The **%D** format is controlled by the `date_format` global option.
* The **%T** format is controlled by the `time_format` global option.
In all cases the format is the one used by the `strftime` POSIX function, for more information visit this [site](https://strftime.org/).
#### Filtering KiBot warnings
KiBot warnings are marked with `(Wn)` where *n* is the warning id.
Some warnings are just recommendations and you could want to avoid them to focus on details that are more relevant to your project.
In this case you can define filters in a similar way used to [filter DRC/ERC errors](#filtering-drc-and-erc-errors).
As an example, if you have the following warning:
```
WARNING:(W43) Missing component `l1:FooBar`
```
You can create the following filter to remove it:
```yaml
global:
filters:
- number: 43
regex: 'FooBar'
```
### Filters and variants
The filters and variants are mechanisms used to modify the circuit components.
Both concepts are closely related. In fact variants can use filters.
The current implementation of the filters allow to exclude components from some of the processing stages. The most common use is to exclude them from some output.
In the future more advanced filters will allow modification of component details.
Variants are currently used to create *assembly variants*. This concept is used to manufature one PCB used for various products.
You can learn more about KiBot variants on the following [example repo](https://inti-cmnb.github.io/kibot_variants_arduprog/).
As mentioned above the current use of filters is to mark some components. Mainly to exclude them, but also to mark them as special.
This is the case of *do not change* components in the BoM.
Filters and variants are defined in separated sections. A filter section looks like this:
```yaml
filters:
- name: 'a_short_name'
type: 'generic'
comment: 'A description'
# Filter options
```
Currently the only type available is `generic`.
#### @filters@
#### Examples for filters
The [tests/yaml_samples](https://github.com/INTI-CMNB/KiBot/tree/master/tests/yaml_samples) directory contains all the regression tests. Many of them test the filters functionality.
- [int_bom_exclude_any.kibot.yaml](https://github.com/INTI-CMNB/KiBot/tree/master/tests/yaml_samples/int_bom_exclude_any.kibot.yaml): Shows how to use regular expressions to match fields and exclude components. Is the more powerful filter mechanism.
- [int_bom_fil_1.kibot.yaml](https://github.com/INTI-CMNB/KiBot/tree/master/tests/yaml_samples/int_bom_fil_1.kibot.yaml): Shows various mechanisms. In particular how to change the list of keywords, usually used to match 'DNF', meaning you can exclude components with arbitrary text.
- [int_bom_fil_2.kibot.yaml](https://github.com/INTI-CMNB/KiBot/tree/master/tests/yaml_samples/int_bom_fil_2.kibot.yaml): Shows how to use KiCad 5 module attributes (from the PCB) to filter SMD, THT and Virtual components. Note KiCad 6 is redefining the attributes.
- [int_bom_include_only.kibot.yaml](https://github.com/INTI-CMNB/KiBot/tree/master/tests/yaml_samples/int_bom_include_only.kibot.yaml): Shows how to use regular expressions to match only some components, instead of including a few.
- [int_bom_var_t2is_csv.kibot.yaml](https://github.com/INTI-CMNB/KiBot/tree/master/tests/yaml_samples/int_bom_var_t2is_csv.kibot.yaml): Shows how to use filters and variants simultaneously, not a good idea, but possible.
- [print_pdf_no_inductors_1.kibot.yaml](https://github.com/INTI-CMNB/KiBot/tree/master/tests/yaml_samples/print_pdf_no_inductors_1.kibot.yaml): Shows how to change the `dnf_filter` for a KiBoM variant.
- [print_pdf_no_inductors_2.kibot.yaml](https://github.com/INTI-CMNB/KiBot/tree/master/tests/yaml_samples/print_pdf_no_inductors_2.kibot.yaml): Shows how to do what `print_pdf_no_inductors_1.kibot.yaml` does but without the need of a variant.
#### Built-in filters
- **_mechanical** is used to exclude:
- References that start with #
- Virtual components
- References that match: '^TP[0-9]*' or '^FID'
- Part names that match: 'regex': 'mount.*hole' or 'solder.*bridge' or 'solder.*jump' or 'test.*point'
- Footprints that match: 'test.*point' or 'mount.*hole' or 'fiducial'
- **_kibom_dnf_Config** it uses the internal `dnf_list` to exclude components with
- Value matching any of the keys
- Any of the keys in the `Config` field (comma or space separated)
- **_kibom_dnc_Config** it uses the internal `dnc_list` to exclude components with
- Value matching any of the keys
- Any of the keys in the `Config` field (comma or space separated)
Note that the last two uses a field named `Config`, but you can customise them invoking **_kibom_dnf_FIELD**. This will create an equivalent filter, but using the indicated **FIELD**.
#### DNF and DNC internal keys
The current list of **DNF** keys is:
- dnf
- dnl
- dnp
- do not fit
- do not place
- do not load
- nofit
- nostuff
- noplace
- noload
- not fitted
- not loaded
- not placed
- no stuff
The current list of **DNC** keys is:
- dnc
- do not change
- no change
- fixed
You can define your own lists as the `int_bom_fil_1.kibot.yaml` shows.
### The *outputs* section
In this section you put all the things that you want to generate.
This section contains one or more **outputs**.
Each output contain the following data:
- `name` a name so you can easily identify it.
- `comment` a short description of this output.
- `type` selects which type of output will be generated.
Examples are *gerbers*, *drill files* and *pick & place files*
- `dir` is the directory where this output will be stored.
- `extends` used to use another output's `options` as base.
- `run_by_default` indicates this output will be created when no specific outputs are requested.
- `disable_run_by_default` can be used to disable the `run_by_default` status of other output.
- `output_id` text to use for the %I expansion content.
- `options` contains one or more options to configure this output.
- `layers` a list of layers used for this output. Not all outputs needs this subsection.
**Important note about the layers**: In the original [kiplot](https://github.com/johnbeard/kiplot)
(from [John Beard](https://github.com/johnbeard)) the name of the inner layers was *Inner.N* where
*N* is the number of the layer, i.e. *Inner.1* is the first inner layer.
This format is supported for compatibility.
Note that this generated a lot of confusion because the default KiCad name for the first inner layer
is *In1.Cu*.
People filled issues and submitted pull-requests to fix it, thinking that inner layers weren't supported.
Currently KiCad allows renaming these layers, so this version of kiplot supports the name used in
KiCad. Just use the same name you see in the user interface.
The available values for *type* are:
- Plot formats:
- `gerber` the gerbers for fabrication.
- `ps` postscript plot
- `hpgl` format for laser printers
- `svg` scalable vector graphics
- `pdf` portable document format
- `dxf` mechanical CAD format
- Drill formats:
- `excellon` data for the drilling machine
- `gerb_drill` drilling positions in a gerber file
- Pick & place
- `position` of the components for the pick & place machine
- Documentation
- `pdf_sch_print` schematic in PDF format
- `svg_sch_print` schematic in SVG format
- `pdf_pcb_print`PDF file containing one or more layer and the page frame
- Bill of Materials
- `bom` The internal BoM generator.
- `kibom` BoM in HTML or CSV format generated by [KiBoM](https://github.com/INTI-CMNB/KiBoM)
- `ibom` Interactive HTML BoM generated by [InteractiveHtmlBom](https://github.com/INTI-CMNB/InteractiveHtmlBom)
- `kicost` BoM in XLSX format with costs generated by [KiCost](https://github.com/INTI-CMNB/KiCost)
- 3D model:
- `step` *Standard for the Exchange of Product Data* for the PCB
- `render_3d` PCB render, from the KiCad's 3D Viewer (broken in KiCad 6.0.0)
- Others:
- `boardview` creates a file useful to repair the board, but without disclosing the full layout.
- `compress` creates an archive containing generated data.
- `download_datasheets` downloads the datasheets for all the components.
- `pcbdraw` nice images of the PCB in customized colors.
- `qr_lib` generates symbol and footprints for QR codes.
- `sch_variant` the schematic after applying all filters and variants, including crossed components.
Here is an example of a configuration file to generate the gerbers for the top and bottom layers:
```yaml
kibot:
version: 1
preflight:
run_drc: true
outputs:
- name: 'gerbers'
comment: "Gerbers for the board house"
type: gerber
dir: gerberdir
options:
# generic layer options
exclude_edge_layer: false
exclude_pads_from_silkscreen: false
plot_sheet_reference: false
plot_footprint_refs: true
plot_footprint_values: true
force_plot_invisible_refs_vals: false
tent_vias: true
line_width: 0.15
# gerber options
use_aux_axis_as_origin: false
subtract_mask_from_silk: true
use_protel_extensions: false
gerber_precision: 4.5
create_gerber_job_file: true
use_gerber_x2_attributes: true
use_gerber_net_attributes: false
layers:
- 'F.Cu'
- 'B.Cu'
```
Most options are the same you'll find in the KiCad dialogs.
Outputs are generated in the order they are declared in the YAML file.
To create them in an arbitrary order use the `--cli-order` command line option and they will be created in the order specified in the command line.
#### Specifying the layers
You have various ways to specify the layers. If you need to specify just one layer you can just use its name:
```yaml
layers: 'F.Cu'
```
If you want to specify all the available layers:
```yaml
layers: 'all'
```
You can also select the layers you want in KiCad (using File, Plot dialog) and save your PCB.
Then you just need to use:
```yaml
layers: 'selected'
```
You can also use any of the following grup of layers:
- **copper** all the copper layers
- **technical** all the technical layers (silk sreen, solder mask, paste, adhesive, etc.)
- **user** all the user layers (draw, comments, eco, margin, edge cuts, etc.)
You can also mix the above definitions using a list:
```yaml
layers:
- 'copper'
- 'Dwgs.User'
```
This will select all the copper layers and the user drawings.
Note that the above mentioned options will use file name suffixes and descriptions selected automatically.
If you want to use a particular suffix and provide better descriptions you can use the following format:
```yaml
layers:
- layer: 'F.Cu'
suffix: 'F_Cu'
description: 'Front copper'
- layer: 'B.Cu'
suffix: 'B_Cu'
description: 'Bottom copper'
```
You can also mix the styles:
```yaml
layers:
- 'copper'
- layer: 'Cmts.User'
suffix: 'Cmts_User'
description: 'User comments'
- 'Dwgs.User'
```
If you need to use the same list of layers for various outputs you can use YAML anchors.
The first time you define the list of layers just assign an anchor, here is an example:
```yaml
layers: &copper_and_cmts
- copper
- 'Cmts.User'
```
Next time you need this list just use an alias, like this:
```yaml
layers: *copper_and_cmts
```
#### @outputs@
#### Consolidating BoMs
Some times your project is composed by various boards, other times you are producing various products at the same time.
In both cases you would want to consolidate the components acquisition in one operation.
Of course you can create individual BoMs for each project in CSV format and then consolidate them using a spreadsheet editor.
But KiBot offers another option: you create a BoM for your main project and then aggregate the components from the other projects.
Here is a simple example. Suppose you have three projects: *merge_1*, *merge_2* and *merge_3*.
For the *merge_1* project you could use the following output:
```yaml
kibot:
version: 1
outputs:
- name: 'bom_csv'
comment: "Bill of Materials in CSV format"
type: bom
dir: BoM
options:
use_alt: true
```
Using the `tests/board_samples/kicad_5/merge_1.sch` from the git repo and storing the above example in `m1.kibot.yaml` you could run:
```shell
src/kibot -c m1.kibot.yaml -e tests/board_samples/kicad_5/merge_1.sch -d test_merge
```
And get `test_merge/BoM/merge_1-bom.csv`:
| Row | Description | Part | References | Value | Footprint | Quantity Per PCB | Status | Datasheet |
|--------------------|-----------------------------------|------|------------|-------|-----------|------------------|--------|-----------|
| 1 | Unpolarized capacitor | C | C1 | 1nF | | 1 | | ~ |
| 2 | Unpolarized capacitor | C | C2 | 10nF | | 1 | | ~ |
| 3 | Resistor | R | R1-R3 | 1k | | 3 | | ~ |
| Project info: | |
|--------------------|-----------------------------------|
| Schematic: | merge_1 |
| Variant: | default |
| Revision: | |
| Date: | 2021-02-02_12-12-27 |
| KiCad Version: | 5.1.9-73d0e3b20d\~88\~ubuntu21.04.1 |
| Statistics: | |
| Component Groups: | 3 |
| Component Count: | 5 |
| Fitted Components: | 5 |
| Number of PCBs: | 1 |
| Total Components: | 5 |
This CSV says you have five components groped in three different types.
They are one 1 nF capacitor, one 10 nF capacitor and three 1 k resistors.
Now lets generate BoMs for the *merge_2* example:
```shell
src/kibot -c m1.kibot.yaml -e tests/board_samples/kicad_5/merge_2.sch -d test_merge
```
We'll get `test_merge/BoM/merge_2-bom.csv`:
| Row | Description | Part | References | Value | Footprint | Quantity Per PCB | Status | Datasheet |
|--------------------|-----------------------------------|------|------------|-------|-----------|------------------|--------|-----------|
| 1 | Unpolarized capacitor | C | C2 | 1nF | | 1 | | ~ |
| 2 | Unpolarized capacitor | C | C1 | 10nF | | 1 | | ~ |
| 3 | Resistor | R | R2-R4 | 1000 | | 3 | | ~ |
| 4 | Resistor | R | R1 | 10k | | 1 | | ~ |
| Project info: | |
|--------------------|-----------------------------------|
| Schematic: | merge_2 |
| Variant: | default |
| Revision: | |
| Date: | 2021-01-27_10-19-46 |
| KiCad Version: | 5.1.9-73d0e3b20d\~88\~ubuntu21.04.1 |
| Statistics: | |
| Component Groups: | 4 |
| Component Count: | 6 |
| Fitted Components: | 6 |
| Number of PCBs: | 1 |
| Total Components: | 6 |
In this project we have six components from four different types.
They are similar to *merge_1* but now we also have a 10 k resistor.
We don't need to generate this BoM to consolidate our projects, but is good to know what we have.
And now lets generate BoMs for the *merge_3* example:
```shell
src/kibot -c m1.kibot.yaml -e tests/board_samples/kicad_5/merge_3.sch -d test_merge
```
We'll get `test_merge/BoM/merge_3-bom.csv`:
| Row | Description | Part | References | Value | Footprint | Quantity Per PCB | Status | Datasheet |
|--------------------|-----------------------------------|------|------------|-------|-----------|------------------|--------|-----------|
| 1 | Resistor | R | R5 | 1k | | 1 | | ~ |
| 2 | Resistor | R | R1-R4 | 10k | | 4 | | ~ |
| Project info: | |
|--------------------|-----------------------------------|
| Schematic: | merge_3 |
| Variant: | default |
| Revision: | |
| Date: | 2021-01-27_10-21-29 |
| KiCad Version: | 5.1.9-73d0e3b20d\~88\~ubuntu21.04.1 |
| Statistics: | |
| Component Groups: | 2 |
| Component Count: | 5 |
| Fitted Components: | 5 |
| Number of PCBs: | 1 |
| Total Components: | 5 |
This time we also have five components, but from two different types.
They are one 1 k resistor and four 10 k resistors.
Now suppose we want to create 10 boards for *merge_1*, 20 for *merge_2* and 30 for *merge_3*.
We could use the following configuration:
```yaml
kibot:
version: 1
outputs:
- name: 'bom_csv'
comment: "Bill of Materials in CSV format"
type: bom
dir: BoM
options:
use_alt: true
number: 10
aggregate:
- file: tests/board_samples/kicad_5/merge_2.sch
number: 20
- file: tests/board_samples/kicad_5/merge_3.sch
number: 30
```
Save it as `m2.kibot.yaml` and run:
```shell
src/kibot -c m2.kibot.yaml -e tests/board_samples/kicad_5/merge_1.sch -d test_merge_consolidate
```
The `test_merge_consolidate/BoM/merge_1-bom.csv` file will be generated containing:
| Row | Description | Part | References | Value | Footprint | Quantity Per PCB | Build Quantity | Status | Datasheet | Source BoM |
|--------------------|-----------------------------------|------|----------------|-------|-----------|------------------|----------------|--------|-----------|----------------------------------|
| 1 | Unpolarized capacitor | C | C1 C2 | 1nF | | 2 | 30 | | ~ | merge_1(1) merge_2(1) |
| 2 | Unpolarized capacitor | C | C2 C1 | 10nF | | 2 | 30 | | ~ | merge_1(1) merge_2(1) |
| 3 | Resistor | R | R1-R3 R2-R4 R5 | 1k | | 7 | 120 | | ~ | merge_1(3) merge_2(3) merge_3(1) |
| 4 | Resistor | R | R1 R1-R4 | 10k | | 5 | 140 | | ~ | merge_2(1) merge_3(4) |
| Project info: | |
|--------------------|-----------------------------------|
| Variant: | default |
| KiCad Version: | 5.1.9-73d0e3b20d\~88\~ubuntu21.04.1 |
| Global statistics: | |
| Component Groups: | 4 |
| Component Count: | 16 |
| Fitted Components: | 16 |
| Number of PCBs: | 60 |
| Total Components: | 320 |
| Project info: | merge_1 |
| Schematic: | merge_1 |
| Revision: | |
| Date: | 2021-02-02_12-12-27 |
| Company: | Test company |
| Statistics: | merge_1 |
| Component Groups: | 3 |
| Component Count: | 5 |
| Fitted Components: | 5 |
| Number of PCBs: | 10 |
| Total Components: | 50 |
| Project info: | merge_2 |
| Schematic: | merge_2 |
| Revision: | |
| Date: | 2021-01-27_10-19-46 |
| Statistics: | merge_2 |
| Component Groups: | 4 |
| Component Count: | 6 |
| Fitted Components: | 6 |
| Number of PCBs: | 20 |
| Total Components: | 120 |
| Project info: | merge_3 |
| Schematic: | merge_3 |
| Revision: | |
| Date: | 2021-01-27_10-21-29 |
| Statistics: | merge_3 |
| Component Groups: | 2 |
| Component Count: | 5 |
| Fitted Components: | 5 |
| Number of PCBs: | 30 |
| Total Components: | 150 |
You can see that now we have much more stats.
They say we have four different types, thirteen for board sets, a total of 60 boards and 250 components.
Then we have individual stats for each project.
The capacitors are easy to interpret, we have 30 1 nF capacitors *merge_1* project has one and *merge_2* another.
As we have 10 *merge_1* and 20 *merge_2* boards this is clear.
But looking at the 1 k resistors is harder. We have 80, three from *merge_1*, one from *merge_2* and another from *merge_3*.
So we have 10*3+20*3+30=120, this is clear, but the BoM says they are R1-R3 R2-R4 R5, which is a little bit confusing.
In this simple example is easy to correlate R1-R3 to *merge_1*, R2-R4 to *merge_2* and R5 to *merge_1*.
For bigger projects this gets harder.
Lets assing an *id* to each project, we'll use 'A' for *merge_1*, 'B' for *merge_2* and 'C' for *merge_3*:
```yaml
kibot:
version: 1
outputs:
- name: 'bom_csv'
comment: "Bill of Materials in CSV format"
type: bom
dir: BoM
options:
use_alt: true
number: 10
ref_id: 'A:'
aggregate:
- file: tests/board_samples/kicad_5/merge_2.sch
number: 20
ref_id: 'B:'
- file: tests/board_samples/kicad_5/merge_3.sch
number: 30
ref_id: 'C:'
```
Now `test_merge_consolidate/BoM/merge_1-bom.csv` will have the following information:
| Row | Description | Part | References | Value | Footprint | Quantity Per PCB | Build Quantity | Status | Datasheet | Source BoM |
|-----|-----------------------|------|--------------------------|-------|-----------|------------------|----------------|--------|-----------|----------------------------------|
| 1 | Unpolarized capacitor | C | A:C1 B:C2 | 1nF | | 2 | 30 | | ~ | merge_1(1) merge_2(1) |
| 2 | Unpolarized capacitor | C | A:C2 B:C1 | 10nF | | 2 | 30 | | ~ | merge_1(1) merge_2(1) |
| 3 | Resistor | R | A:R1-A:R3 B:R2-B:R4 C:R5 | 1k | | 7 | 120 | | ~ | merge_1(3) merge_2(3) merge_3(1) |
| 4 | Resistor | R | B:R1 C:R1-C:R4 | 10k | | 5 | 140 | | ~ | merge_2(1) merge_3(4) |
As you can see now we know `A` has R1-R3, `B` R2-R4 and for `C` R5 is the 1k resistor.
If we want to compact the `Source BoM` column we just need to enable the `source_by_id` option:
```yaml
kibot:
version: 1
outputs:
- name: 'bom_csv'
comment: "Bill of Materials in CSV format"
type: bom
dir: BoM
options:
use_alt: true
number: 10
ref_id: 'A:'
source_by_id: true
aggregate:
- file: tests/board_samples/kicad_5/merge_2.sch
number: 20
ref_id: 'B:'
- file: tests/board_samples/kicad_5/merge_3.sch
number: 30
ref_id: 'C:'
```
And we'll get:
| Row | Description | Part | References | Value | Footprint | Quantity Per PCB | Build Quantity | Status | Datasheet | Source BoM |
|-----|-----------------------|------|--------------------------|-------|-----------|------------------|----------------|--------|-----------|-------------------|
| 1 | Unpolarized capacitor | C | A:C1 B:C2 | 1nF | | 2 | 30 | | ~ | A:(1) B:(1) |
| 2 | Unpolarized capacitor | C | A:C2 B:C1 | 10nF | | 2 | 30 | | ~ | A:(1) B:(1) |
| 3 | Resistor | R | A:R1-A:R3 B:R2-B:R4 C:R5 | 1k | | 7 | 120 | | ~ | A:(3) B:(3) C:(1) |
| 4 | Resistor | R | B:R1 C:R1-C:R4 | 10k | | 5 | 140 | | ~ | B:(1) C:(4) |
#### Importing outputs from another file
In some cases you may want to reuse configuration files. An example of this are the example files that generate gerbers and drill files for various manufacturers ([see](https://github.com/INTI-CMNB/KiBot/tree/master/docs/samples)).
In this case you can create a section named `import` containing a list of configuration files. Here is an example:
```yaml
import:
- configs/Elecrow.kibot.yaml
- configs/FusionPCB.kibot.yaml
- configs/JLCPCB.kibot.yaml
- configs/P-Ban.kibot.yaml
- configs/PCBWay.kibot.yaml
```
This will import all the outputs from the listed files.
#### Using other output as base for a new one
If you need to define an output that is similar to another, and you want to avoid copying the options from the former, you can *extend* an output.
To achieve it just specify the name of the base output in the `extends` value.
Note that this will use the `options` of the other output as base, not other data as the comment.
Also note that you can use YAML anchors, but this won't work if you are importing the base output from other file.
Additionally you must be aware that extending an output doesn't disable the base output.
If you need to disable the original output use `disable_run_by_default` option.
#### Importing filters and variants from another file
This is a more complex case of the previous [Importing outputs from another file](#importing-outputs-from-another-file).
In this case you must use the more general syntax:
```yaml
import:
- file: FILE_CONTAINING_THE_YAML_DEFINITIONS
outputs: LIST_OF_OUTPUTS
filters: LIST_OF_FILTERS
variants: LIST_OF_VARIANTS
global: LIST_OF_GLOBALS
```
This syntax is flexible. If you don't define which `outputs`, `filters`, `variants` and/or `global` all will be imported. So you can just omit them, like this:
```yaml
import:
- file: FILE_CONTAINING_THE_YAML_DEFINITIONS
```
The `LIST_OF_items` can be a YAML list or just one string. Here is an example:
```yaml
import:
- file: FILE_CONTAINING_THE_YAML_DEFINITIONS
outputs: one_name
filters: ['name1', 'name2']
```
This will import the `one_name` output and the `name1` and `name2` filters. As `variants` is omitted, all variants will be imported.
You can also use the `all` and `none` special names, like this:
```yaml
import:
- file: FILE_CONTAINING_THE_YAML_DEFINITIONS
outputs: all
filters: all
variants: none
global: none
```
This will import all outputs and filters, but not variants or globals.
Also note that imported globals has more precendence than the ones defined in the same file.
## Usage
If you need a template for the configuration file try:
```shell
kibot --example
```
This will generate a file named `example.kibot.yaml` containing all the available options and comments about them.
You can use it to create your own configuration file.
If you want to use the layers of a particular PCB in the example use:
```shell
kibot -b PCB_FILE --example
```
And if you want to use the same options selected in the plot dialog use:
```shell
kibot -b PCB_FILE -p --example
```
If the current directory contains only one PCB file and only one configuration file (named *.kibot.yaml) you can just call `kibot`.
No arguments needed.
The tool will figure out which files to use.
If more than one file is found in the current directory `kibot` will use the first found and issue a warning.
If you need to use other file just tell it explicitly:
```shell
kibot -b PCB_FILE.kicad_pcb -c CONFIG.kibot.yaml
```
A simple target can be added to your `makefile`, so you can just run `make pcb_files` or integrate into your current build process.
```Makefile
pcb_files:
kibot -b $(PCB) -c $(KIBOT_CFG)
```
If you need to supress messages use `--quiet` or `-q` and if you need to get more informatio about what's going on use `--verbose` or `-v`.
If you want to generate only some of the outputs use:
```shell
kibot OUTPUT_1 OUTPUT_2
```
If you want to generate all outputs with some exceptions use:
```shell
kibot --invert-sel OUTPUT_1 OUTPUT_2
```
Note that you can use the `run_by_default` option of the output you want to exclude from the default runs.
If you want to skip the DRC and ERC use:
```shell
kibot --skip-pre run_erc,run_drc
```
If you want to skip all the `preflight` tasks use:
```shell
kibot --skip-pre all
```
All outputs are generated using the current directory as base.
If you want to use another directory as base use:
```shell
kibot --out-dir OTHER_PLACE
```
If you want to list the available outputs defined in the configuration file use:
```shell
kibot --list
```
### Command line help
```
@cmd_help@
```
## Installation
### Dependencies
- For ERC, DRC, BoM XML update and PCB/SCH print install [KiCad Automation Scripts](https://github.com/INTI-CMNB/kicad-automation-scripts/)
- BoM files (HTML/CSV/TSV/TXT/XML/XLSX) can be generated using the internal BoM generator or using [KiBoM](https://github.com/INTI-CMNB/KiBoM).
- For interactive BoM install [InteractiveHtmlBom](https://github.com/INTI-CMNB/InteractiveHtmlBom)
- For SVG/PNG/JPG beauty PCB render [PcbDraw](https://github.com/INTI-CMNB/PcbDraw). Also install the convert (from imagemagick) and rsvg-convert (from librsvg2-bin) tools.
- To create RAR files install the rar tool.
- The `distutils` module. This is part of Python, but on debian systems this is in a separated package: `python3-distutils`
### Installation on Ubuntu/Debian
Get the Debian package from the [releases section](https://github.com/INTI-CMNB/KiBot/releases) and run:
```shell
sudo apt install ./kibot*_all.deb
```
**Important note**: Sometimes the release needs another packages that aren't part of the stable Debian distribution.
In this case the packages are also included in the release page. As an example version 0.6.0 needs:
```shell
sudo apt install ./python3-mcpy_2.0.2-1_all.deb ./kibot_0.6.0-1_all.deb
```
### Installation using pip
```shell
pip install --no-compile kibot
```
Note that `pip` has the dubious idea of compiling everything it downloads.
There is no advantage in doing it and it interferes with the `mcpy` macros.
If you are installing at system level I recommend generating the compilation caches after installing.
As `root` just run:
```shell
kibot --help-outputs > /dev/null
```
Note that `pip` will automatically install all the needed Python dependencies.
But it won't install other interesting dependencies.
In particular you should take a look at the [KiCad Automation Scripts](https://github.com/INTI-CMNB/kicad-automation-scripts/) dependencies.
If you have a Debian based OS I strongly recommend trying to use the `.deb` packages for all the tools.
### Notes about virtualenv
If you try to use a Python virtual environment you'll need to find a way to make the KiCad module (`pcbnew`) available on it.
I don't know how to make it.
### Installation on other targets
- Install KiCad 5.1.6 or newer
- Install Python 3.5 or newer
- Install the Python Yaml and requests modules
- Run the script *src/kibot*
## Usage for CI/CD
When using a GitHub or GitLab repo you can use KiBot to generate all the needed stuff each time you commit a change to the schematic and/or PCB file.
Examples of how to do it can be found [here for GitHub](https://github.com/INTI-CMNB/kicad_ci_test) and [here for GitLab](https://gitlab.com/set-soft/kicad-ci-test).
In order to run KiBot on these environments you need a lot of software installed. The usual mechanism to achieve this is using [docker](https://www.docker.com/). Docker images containing KiBot, all the supporting scripts and a corresponding KiCad can be found at [Docker Hub](https://hub.docker.com/) as [setsoft/kicad_auto:latest](https://hub.docker.com/repository/docker/setsoft/kicad_auto). This image is based on [setsoft/kicad_debian:latest](https://hub.docker.com/repository/docker/setsoft/kicad_debian), containing KiCad on Debian GNU/Linux.
If you need to run the current development version of KiBot you can use the following docker image: [setsoft/kicad_auto:dev](https://hub.docker.com/repository/docker/setsoft/kicad_auto).
For more information about the docker images visit [kicad_debian](https://github.com/INTI-CMNB/kicad_debian) and [kicad_auto](https://github.com/INTI-CMNB/kicad_auto).
### Usage of Github Actions
You need to put a [config.kibot.yaml](#configuration) file into the KiCad project folder.
Here is an example of workflow file using the GitHub Action:
```yaml
name: example
on:
push:
paths:
- '**.sch'
- '**.kicad_pcb'
pull_request:
paths:
- '**.sch'
- '**.kicad_pcb'
jobs:
example:
runs-on: ubuntu-latest
steps:
- uses: actions/checkout@v2
- uses: INTI-CMNB/KiBot@v1
with:
# Required - kibot config file
config: config.kibot.yaml
# optional - prefix to output defined in config
dir: output
# optional - schematic file
schema: '*.sch'
# optional - PCB design file
board: '*.kicad_pcb'
- name: upload results
uses: actions/upload-artifact@v2
with:
name: output
path: output
```
A working example applied to a repo can be found [here](https://github.com/INTI-CMNB/kicad-ci-test-spora/tree/test_gh_action).
## Notes about Gerber format
I found this topic poorly documented and quite complex. So here is what I know, feel free to send me any corrections.
Note that this is a very dynamic topic and this text was written in november 2020.
The gerber format is controlled by [Ucamco](https://www.ucamco.com/en/), a leading manufacturer of equipment and software for PCB fabrication.
Even when this isn't an open standard they release the spec for free and interact with Jean-Pierre Charras (father of KiCad).
So KiCad support for gerber format is really updated.
The gerber format evolved with time, here are the versions I know:
* **RS-274D** obsolete version of the format.
* **RS-274X** (aka **X1**) this is the *extended* version of the format. Is the most widely supported, but has some limitations.
* **X2** this is the format currently recommended by Ucamco and the default for modern KiCad versions.
This extension adds important meta-data to the files. It helps CAM operators to know what's every drawing in the image.
So you know which are pads, tracks, etc. And also more interesting information: impedance controlled tracks, the role of each file, etc.
Using X2 you can know what is each file without the need of special names or file extensions.
KiCad can generate drill files using X2.
* **X3** this is the current draft. One interesting addition is the *Components* role.
These files replaces the position files, adding important information about the footprint.
In addition to them is the spec for the **Gerber Job** file. This file was introduced between X2 and X3, and is used to group all the gerber files.
The *gbrjob* file contains all the missing stack-up information.
KiCad 5 can generate X1, X2 and gerber job files, including drill information in gerber format.
KiCad 5.99 (6.0 pre-release) can also generate X3 files (position files in gerber format).
As you can see the idea of Ucamco is to unify all fabrication information in one format.
The **X2** format was designed in a way that software that fully implement **X1** can just ignore the added meta-data.
In an ideal world you shouldn't bother about it and generate **X2** files. Just use the **gbr** file extension and a *gbrjob* file.
The problem is with poorly implemented CAM tools. In particular **CAM350**, used by various important cheap China manufacturers.
This software has known issues interpretating aperture macros and some X2 data.
If your manufacturer has problems with your files check the following:
* Put gerber, drill and position files in the same directory.
* Disable **X2** extensions (`use_gerber_x2_attributes` set to `false`)
* Use arcaic role mechanism (`use_protel_extensions` set to `true`)
* Disable **aperture macros** (KiCad 6 only: `disable_aperture_macros` set to `true`)
The [kicad-gerberzipper](https://github.com/g200kg/kicad-gerberzipper) is an action plugin for KiCad oriented to help to generate gerber and drill files for some manufacturers.
I adapted the configurations from kicad-gerberzipper to KiBot configurations, you can find them in the `docs/samples/` directory.
They include support for:
- [Elecrow](https://www.elecrow.com/)
- [FusionPCB](https://www.seeedstudio.io/fusion.html)
- [JLCPCB](https://jlcpcb.com/)
- [P-Ban](https://www.p-ban.com/)
- [PCBWay](https://www.pcbway.com)
## Notes about the position file
Position files are quite simple. You can generate them as plain text (ASCII) or as a spreadsheet (CSV).
But some conventions can make them tricky. Some manufacturers, like [JLCPCB](https://jlcpcb.com/), uses conventions that are incompatible with KiCad.
The [following blog](https://dubiouscreations.com/2019/10/21/using-kicad-with-jlcpcb-assembly-service/) explains how to adapt the position files generated by KiCad to what JLCPCB needs.
To achieve it the author uses a script called [JLCKicadTools](https://github.com/matthewlai/JLCKicadTools).
You can achieve the same using KiBot. Here is a configuration example that generates the BoM and position files in the same way JLCKicadTools does:
```yaml
kibot:
version: 1
filters:
- name: only_jlc_parts
comment: 'Only parts with JLC code'
type: generic
include_only:
- column: 'LCSC#'
regex: '^C\d+'
variants:
- name: rotated
comment: 'Just a place holder for the rotation filter'
type: kibom
variant: rotated
pre_transform: _rot_footprint
outputs:
- name: 'position'
comment: "Pick and place file, JLC style"
type: position
options:
variant: rotated
output: '%f_cpl_jlc.%x'
format: CSV
units: millimeters
separate_files_for_front_and_back: false
only_smd: true
columns:
- id: Ref
name: Designator
- Val
- Package
- id: PosX
name: "Mid X"
- id: PosY
name: "Mid Y"
- id: Rot
name: Rotation
- id: Side
name: Layer
- name: 'bom'
comment: "BoM for JLC"
type: bom
options:
output: '%f_%i_jlc.%x'
exclude_filter: 'only_jlc_parts'
ref_separator: ','
columns:
- field: Value
name: Comment
- field: References
name: Designator
- Footprint
- field: 'LCSC#'
name: 'LCSC Part #'
csv:
hide_pcb_info: true
hide_stats_info: true
quote_all: true
```
The `only_jlc_parts` filter is used to generate the BoM and assumes you put the JLC component code in a field named `LCSC#` (JLC uses [LCSC](https://lcsc.com/) as supplier).
Note that the author of the blog simply used `Field4` for this and his script searches for any field containing the `^C\d+` pattern.
I think this isn't a good idea and I suggest using a defined name, like in this example.
The `rotated` variant is used only to apply the `_rot_footprint` transformation filter. This filter is an internal filter of type `rot_footprint`.
Here is the same configuration file making explicit use of the rotation filter:
```yaml
kibot:
version: 1
filters:
- name: fix_rotation
comment: 'Adjust rotation for JLC'
type: rot_footprint
- name: only_jlc_parts
comment: 'Only parts with JLC code'
type: generic
include_only:
- column: 'LCSC#'
regex: '^C\d+'
variants:
- name: rotated
comment: 'Just a place holder for the rotation filter'
type: kibom
variant: rotated
pre_transform: fix_rotation
outputs:
- name: 'position'
comment: "Pick and place file, JLC style"
type: position
options:
variant: rotated
output: '%f_cpl_jlc.%x'
format: CSV
units: millimeters
separate_files_for_front_and_back: false
only_smd: true
columns:
- id: Ref
name: Designator
- Val
- Package
- id: PosX
name: "Mid X"
- id: PosY
name: "Mid Y"
- id: Rot
name: Rotation
- id: Side
name: Layer
- name: 'bom'
comment: "BoM for JLC"
type: bom
options:
output: '%f_%i_jlc.%x'
exclude_filter: 'only_jlc_parts'
ref_separator: ','
columns:
- field: Value
name: Comment
- field: References
name: Designator
- Footprint
- field: 'LCSC#'
name: 'LCSC Part #'
csv:
hide_pcb_info: true
hide_stats_info: true
quote_all: true
```
As you can see we now create a filter named `fix_rotation` of type `rot_footprint`:
```yaml
- name: fix_rotation
comment: 'Adjust rotation for JLC'
type: rot_footprint
```
Using it, instead of the internal filter named `_rot_footprint`, is the same here. But you can then customize the filter.
The filter supports the following options:
- `extend`: [boolean=true] Extends the internal list of rotations with the one provided. Otherwise just use the provided list.
- `negative_bottom`: [boolean=true] Rotation for bottom components is computed via subtraction as `(component rot - angle)`. Note that this should be coherent with the `bottom_negative_x` of the position output.
- `invert_bottom`: [boolean=false] Rotation for bottom components is negated, resulting in either: `(- component rot - angle)` or when combined with `negative_bottom`, `(angle - component rot)`.
- `rotations`: [list(list(string))] A list of pairs regular expression/rotation. Components matching the regular expression will be rotated the indicated angle. Special names `_top` and `_bottom` will match all components on that side of the board.
In order to add a new rotation or just change an existing one you just need to use the `rotations` option.
As an example: the internal list of rotations rotates QFN packages by 270 degrees, no suppose you want to rotate them just 90 degrees.
The filter will look like this:
```yaml
- name: fix_rotation
comment: 'Adjust rotation for JLC'
type: rot_footprint
rotations:
- ["^QFN-", 90.0]
```
This regular expression will match any footprint starting with `QFN-` and rotate it 90 degrees.
The internal list of rotations is:
| Footprint | Rotation |
| :-------------------------------------------------- | -------: |
|`^Bosch_LGA-8_2x2.5mm_P0.65mm_ClockwisePinNumbering` | 90.0 |
|`^R_Array_Convex_` | 90.0 |
|`^R_Array_Concave_` | 90.0 |
|`^SOT-223` | 180.0 |
|`^SOT-23` | 180.0 |
|`^TSOT-23` | 180.0 |
|`^SOT-353` | 180.0 |
|`^QFN-` | 270.0 |
|`^LQFP-` | 270.0 |
|`^TQFP-` | 270.0 |
|`^SOP-(?!18_)` | 270.0 |
|`^TSSOP-` | 270.0 |
|`^DFN-` | 270.0 |
|`^SOIC-` | 270.0 |
|`^VSSOP-10_` | 270.0 |
|`^CP_EIA-3216-18_` | 180.0 |
|`^CP_EIA-3528-15_AVX-H` | 180.0 |
|`^CP_EIA-3528-21_Kemet-B` | 180.0 |
|`^CP_Elec_8x10.5` | 180.0 |
|`^CP_Elec_6.3x7.7` | 180.0 |
|`^CP_Elec_8x6.7` | 180.0 |
|`^CP_Elec_8x10` | 180.0 |
|`^(.*?_\|V)?QFN-(16\|20\|24\|28\|40)(-\|_\|$)` | 270.0 |
|`^PowerPAK_SO-8_Single` | 270.0 |
|`^HTSSOP-28-1EP_4.4x9.7mm*` | 270.0 |
## Credits
- **KiBot project**: Salvador E. Tropea (@set-soft)
- **Original KiPlot project**: John Beard (@johnbeard)
- **Original KiCad Automation Scripts**: Scott Bezek, Productize SPRL
- **KiBoM**: Oliver Henry Walters (@SchrodingersGat)
- **Interactive HTML BoM**: @qu1ck
- **PcbDraw**: Jan Mrázek (@yaqwsx)
- **KiCost**: Dave Vandenbout (@devbisme) and Hildo Guillardi Júnior (@hildogjr)
- **KiCAD to Boardview exporter**: @whitequark
- **S-expression parser**: Takafumi Arakaki
- **Python macros**: Juha Jeronen (@Technologicat)
- **Contributors**:
- **Error filters ideas**: Leandro Heck (@leoheck)
- **GitHub Actions Integration/SVG output**: @nerdyscout
- **Plug-in loader fix**: Stavros Korokithakis (@skorokithakis)
- **SCH loader fix**: @Sabolik
- **SCH library loader fix**: Bernhard B. (@bbernhard)
- **GitHub Actions fix**: @TheSlowGrowth
- **Easier README navigation**: Robin Vobruba (@hoijui)
- **Typos corrections**: Seth Kaz (@sethkaz) and Sebastian Grau (@SebastianGrau)
- **Sources of inspiration and good ideas**:
- **JLC Kicad Tools**: Matthew Lai (@matthewlai)
- **KiCad Gerber Zipper**: @g200kg
- **pimpmykicadbom**: Anton Savov (@antto)
- **Others**:
- **Robot in the logo**: Christian Plaza (from pixabay)