2298 lines
101 KiB
Plaintext
2298 lines
101 KiB
Plaintext
# KiBot (formerly KiPlot)
|
|
|
|

|
|
|
|
[](https://github.com/INTI-CMNB/KiBot/actions)
|
|
[](https://coveralls.io/github/INTI-CMNB/KiBot?branch=master)
|
|
[](https://pypi.org/project/kibot/)
|
|
[](https://www.paypal.com/donate/?hosted_button_id=K2T86GDTTMRPL)
|
|
|
|
@doc_id@
|
|
|
|
**Important for CI/CD**:
|
|
- The GitHub actions now use the full/test docker images. So now they include PanDoc and also Blender.
|
|
- If you are looking for the GitHub Actions documentation, and you already know how to use KiBot, or want a quick start, read: [GitHub Actions](#usage-of-github-actions)
|
|
|
|
**New on v1.6.2**
|
|
- KiCad 7.0.2 support
|
|
- Colored 3D THT resistors
|
|
|
|
## Index
|
|
|
|
* [Introduction](#introduction)
|
|
* [Installation](#installation)
|
|
* [Dependencies](#dependencies)
|
|
* [Installation on Ubuntu or Debian](#installation-on-ubuntu-or-debian)
|
|
* [Installation using pip](#installation-using-pip)
|
|
* [Notes about virtualenv](#notes-about-virtualenv)
|
|
* [Installation on other targets](#installation-on-other-targets)
|
|
* [Configuration](#configuration)
|
|
* [Quick start](#quick-start)
|
|
* [Section order](#section-order)
|
|
* [The header](#the-header)
|
|
* [The *preflight* section](#the-preflight-section)
|
|
* [Supported *preflight* options](#supported-preflight-options)
|
|
* [More about *pcb_replace* and *sch_replace*](#more-about-pcb_replace-and-sch_replace)
|
|
* [Filtering DRC and ERC errors](#filtering-drc-and-erc-errors)
|
|
* [Default global options](#default-global-options)
|
|
* [Default *output* option](#default-output-option)
|
|
* [Default *dir* option](#default-dir-option)
|
|
* [Default *variant* option](#default-variant-option)
|
|
* [Default *units* option](#default-units-option)
|
|
* [Output directory option](#output-directory-option)
|
|
* [Date format option](#date-format-option)
|
|
* [PCB details options](#pcb-details-options)
|
|
* [Filtering KiBot warnings](#filtering-kibot-warnings)
|
|
* [All available global options](#all-available-global-options)
|
|
* [Filters and variants](#filters-and-variants)
|
|
* [Supported filters](#supported-filters)
|
|
* [Examples for filters](#examples-for-filters)
|
|
* [Built-in filters](#built-in-filters)
|
|
* [Supported variants](#supported-variants)
|
|
* [Changing the 3D model, simple mechanism](#changing-the-3d-model-simple-mechanism)
|
|
* [Changing the 3D model, complex mechanism](#changing-the-3d-model-complex-mechanism)
|
|
* [DNF and DNC internal keys](#dnf-and-dnc-internal-keys)
|
|
* [The *outputs* section](#the-outputs-section)
|
|
* [Specifying the layers](#specifying-the-layers)
|
|
* [Supported outputs](#supported-outputs)
|
|
* [Consolidating BoMs](#consolidating-boms)
|
|
* [Importing outputs from another file](#importing-outputs-from-another-file)
|
|
* [Importing other stuff from another file](#importing-other-stuff-from-another-file)
|
|
* [Parametrizable imports](#parametrizable-imports)
|
|
* [Importing internal templates](#importing-internal-templates)
|
|
* [Using other output as base for a new one](#using-other-output-as-base-for-a-new-one)
|
|
* [Grouping outputs](#grouping-outputs)
|
|
* [Doing YAML substitution or preprocessing](#doing-yaml-substitution-or-preprocessing)
|
|
* [Default definitions](#default-definitions)
|
|
* [Definitions during import](#definitions-during-import)
|
|
* [Recursive definitions expansion](#recursive-definitions-expansion)
|
|
* [Usage](#usage)
|
|
* [Usage for CI/CD](#usage-for-cicd)
|
|
* [GitHub Actions](#usage-of-github-actions)
|
|
* [GitHub Actions tags](#github-actions-tags)
|
|
* [GitHub Cache](#github-cache)
|
|
* [Contributing](#contributing)
|
|
* [Notes about Gerber format](#notes-about-gerber-format)
|
|
* [Notes about the position file](#notes-about-the-position-file)
|
|
* [XYRS files](#xyrs-files)
|
|
* [Notes about 3D models](#notes-about-3d-models)
|
|
* [Proposed advanced KiCad usage](#proposed-advanced-kicad-usage)
|
|
* [One circuit and more than one PCB implementation](#one-circuit-and-more-than-one-pcb-implementation)
|
|
* [System with more than one PCB](#system-with-more-than-one-pcb)
|
|
* [Credits](#credits)
|
|
|
|
## Introduction
|
|
|
|
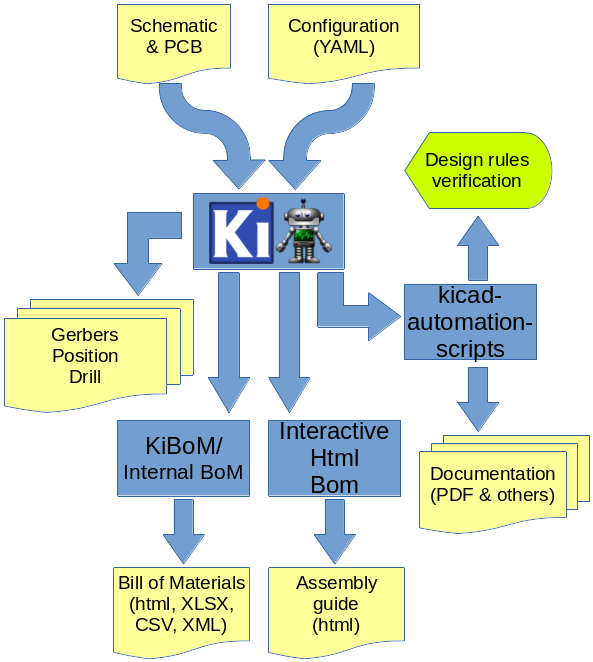
KiBot is a program which helps you to generate the fabrication and
|
|
documentation files for your KiCad projects easily, repeatable, and
|
|
most of all, scriptably. This means you can use a Makefile to export
|
|
your KiCad PCBs just as needed, or do it in a CI/CD environment.
|
|
|
|
For example, it's common that you might want for each board rev:
|
|
|
|
* Check ERC/DRC one last time (using [KiCad Automation Scripts](https://github.com/INTI-CMNB/kicad-automation-scripts/))
|
|
* Gerbers, drills and drill maps for a fab in their favourite format
|
|
* Fab docs for the assembler, including the BoM (Bill of Materials), costs spreadsheet and board view
|
|
* Pick and place files
|
|
* PCB 3D model in STEP, VRML and PCB3D formats
|
|
* PCB 3D render in PNG format
|
|
* Compare PCB/SCHs
|
|
* Panelization
|
|
* Stencil creation
|
|
|
|
You want to do this in a one-touch way, and make sure everything you need to
|
|
do so is securely saved in version control, not on the back of an old
|
|
datasheet.
|
|
|
|
KiBot lets you do this. The following picture depicts the data flow:
|
|
|
|
|
|
|
|
If you want to see this concept applied to a real world project visit the [Spora CI/CD](https://github.com/INTI-CMNB/kicad-ci-test-spora) example.
|
|
|
|
## Installation
|
|
|
|
KiBot main target is Linux, but some users successfully use it on Windows. For Windows you'll need to install tools to mimic a Linux environment.
|
|
Running KiBot on MacOSX should be possible now that KiCad migrated to Python 3.x.
|
|
|
|
You can also run KiBot using docker images in a CI/CD environment like GitHub or GitLab. In this case you don't need to install anything locally.
|
|
|
|
### Dependencies
|
|
|
|
Notes:
|
|
- When installing from the [Debian repo](https://set-soft.github.io/debian/) you don't need to worry about dependencies, just pay attention to *recommended* and *suggested* packages.
|
|
- When installing using `pip` the dependencies marked with  will be automatically installed.
|
|
- The dependencies marked with  can be downloaded on-demand by KiBot.
|
|
Note this is poorly tested and is mostly oriented to 64 bits Linux systems. Please report problems.
|
|
- The `kibot-check` tool can help you to know which dependencies are missing.
|
|
- Note that on some systems (i.e. Debian) ImageMagick disables PDF manipulation in its `policy.xml` file.
|
|
Comment or remove lines like this: `<policy domain="coder" rights="none" pattern="PDF" />` (On Debian: `/etc/ImageMagick-6/policy.xml`)
|
|
-  Link to Debian stable package.
|
|
-  This is a Python module, not a separated tool.
|
|
-  This is an independent tool, can be a binary or a Python script.
|
|
|
|
@dependencies@
|
|
|
|
### Installation on Ubuntu or Debian
|
|
|
|
The easiest way is to use the [repo](https://set-soft.github.io/debian/), but if you want to manually install the individual `.deb` files you can:
|
|
|
|
Get the Debian package from the [releases section](https://github.com/INTI-CMNB/KiBot/releases) and run:
|
|
```shell
|
|
sudo apt install ./kibot*_all.deb
|
|
```
|
|
|
|
**Important note**: Sometimes the release needs another packages that aren't part of the stable Debian distribution.
|
|
In this case the packages are also included in the release page. As an example version 0.6.0 needs:
|
|
|
|
```shell
|
|
sudo apt install ./python3-mcpy_2.0.2-1_all.deb ./kibot_0.6.0-1_all.deb
|
|
```
|
|
|
|
**Important note**: The [KiCad Automation Scripts](https://github.com/INTI-CMNB/kicad-automation-scripts/) packages are a mandatory dependency.
|
|
The [KiBoM](https://github.com/INTI-CMNB/KiBoM), [InteractiveHtmlBom](https://github.com/INTI-CMNB/InteractiveHtmlBom) and [PcbDraw](https://github.com/INTI-CMNB/PcbDraw) are recommended.
|
|
|
|
### Installation using pip
|
|
|
|
```shell
|
|
pip install --no-compile kibot
|
|
```
|
|
|
|
Note that `pip` has the dubious idea of compiling everything it downloads.
|
|
There is no advantage in doing it and it interferes with the `mcpy` macros.
|
|
Also note that in modern Linux systems `pip` was renamed to `pip3`, to avoid confusion with `pip` from Python 2.
|
|
|
|
If you are installing at system level I recommend generating the compilation caches after installing.
|
|
As `root` just run:
|
|
|
|
```shell
|
|
kibot --help-outputs > /dev/null
|
|
```
|
|
|
|
Note that `pip` will automatically install all the needed Python dependencies.
|
|
But it won't install other interesting dependencies.
|
|
In particular you should take a look at the [KiCad Automation Scripts](https://github.com/INTI-CMNB/kicad-automation-scripts/) dependencies.
|
|
If you have a Debian based OS I strongly recommend trying to use the `.deb` packages for all the tools.
|
|
|
|
If you want to install the code only for the current user add the `--user` option.
|
|
|
|
If you want to install the last git code from GitHub using pip use:
|
|
|
|
```shell
|
|
pip3 install --user git+https://github.com/INTI-CMNB/KiBot.git
|
|
```
|
|
|
|
You can also clone the repo, change to its directory and install using:
|
|
|
|
```shell
|
|
pip3 install --user -e .
|
|
```
|
|
|
|
In this way you can change the code and you won't need to install again.
|
|
|
|
### Notes about virtualenv
|
|
|
|
If you try to use a Python virtual environment you'll need to find a way to make the KiCad module (`pcbnew`) available on it.
|
|
I don't know how to make it.
|
|
|
|
In addition: note that the virtual env will change the system share data paths. They will no longer point to things like `/usr/share/`
|
|
but to a virtual env place. So you'll need to either define environment variables to tell KiBot where are the libs or just add
|
|
symlinks from the virtual env to the system level libs.
|
|
|
|
### Installation on other targets
|
|
|
|
- Install KiCad 5.1.6 or newer
|
|
- Install Python 3.5 or newer
|
|
- Install the Python Yaml and requests modules
|
|
- Run the script *src/kibot*
|
|
|
|
## Configuration
|
|
|
|
KiBot uses a configuration file where you can specify what *outputs* to
|
|
generate and which preflight (before *launching* the outputs generation)
|
|
actions to perform. By default you'll generate all of them, but you can specify which
|
|
ones from the command line.
|
|
|
|
The configuration file should be named using the **.kibot.yaml** suffix,
|
|
i.e. *my_project.kibot.yaml*. The format used is [YAML](https://yaml.org/).
|
|
This is basically a text file with some structure.
|
|
This file can be compressed using *gzip* file format.
|
|
|
|
If you never used YAML read the following [explanation](docs/KiPlotYAML.md).
|
|
Note that the explanation could be useful even if you know YAML.
|
|
|
|
### Quick start
|
|
|
|
If you want to *learn by examples*, or you just want to take a look a what
|
|
KiBot can do, you can use the `--quick-start` command line option.
|
|
|
|
First change to the directory where your project (or projects) is located.
|
|
Now run KiBot like this:
|
|
|
|
```shell
|
|
kibot --quick-start
|
|
```
|
|
|
|
This will look for KiCad projects starting from the current directory and
|
|
going down the directory structure. For each project found KiBot will
|
|
generate a configuration file showing some common outputs. After creating
|
|
the configuration files KiBot will start the outputs generation.
|
|
|
|
Here is an [example](https://inti-cmnb.github.io/kibot_variants_arduprog_site/Browse/t1-navigate.html)
|
|
of what's generated using the following [example repo](https://inti-cmnb.github.io/kibot_variants_arduprog/).
|
|
|
|
You can use the generated files as example of how to configure KiBot.
|
|
If you want to just generate the configuration files and not the outputs
|
|
use:
|
|
|
|
```shell
|
|
kibot --quick-start --dry
|
|
```
|
|
|
|
If you want to know about all the possible options for all the available
|
|
outputs you can try:
|
|
|
|
```shell
|
|
kibot --example
|
|
```
|
|
|
|
This will generate a configuration file with all the available outputs
|
|
and all their options.
|
|
|
|
### Section order
|
|
|
|
The file is divided in various sections. Some of them are optional.
|
|
|
|
The order in which they are declared is not relevant, they are interpreted in the following order:
|
|
|
|
- `kiplot`/`kibot` see [The header](#the-header)
|
|
- `import` see [Importing outputs from another file](#importing-outputs-from-another-file),
|
|
[Importing filters and variants from another file](#importing-other-stuff-from-another-file) and
|
|
[Importing internal templates](#importing-internal-templates)
|
|
- `global` see [Default global options](#default-global-options)
|
|
- `filters` see [Filters and variants](#filters-and-variants)
|
|
- `variants` see [Filters and variants](#filters-and-variants)
|
|
- `preflight` see [The *preflight* section](#the-preflight-section)
|
|
- `outputs` see [The *outputs* section](#the-outputs-section)
|
|
- `groups` see [Grouping outputs](#grouping-outputs)
|
|
|
|
### The header
|
|
|
|
All configuration files must start with:
|
|
|
|
```yaml
|
|
kibot:
|
|
version: 1
|
|
```
|
|
|
|
This tells to KiBot that this file is using version 1 of the format.
|
|
|
|
### The *preflight* section
|
|
|
|
This section is used to specify tasks that will be executed before generating any output.
|
|
|
|
#### @preflight@
|
|
|
|
Here is an example of a *preflight* section:
|
|
|
|
```yaml
|
|
preflight:
|
|
run_erc: true
|
|
update_xml: true
|
|
run_drc: true
|
|
check_zone_fills: true
|
|
ignore_unconnected: false
|
|
```
|
|
|
|
#### More about *pcb_replace* and *sch_replace*
|
|
|
|
These options are supposed to be used in a version control environment.
|
|
This is because, unlike other options, they modify the PCB and/or schematic and might damage them.
|
|
In a version control environment you can just roll-back the changes.
|
|
|
|
Don't be afraid, they make a back-up of the files and also tries to disable dangerous changes.
|
|
But should be used carefully. They are ideal for CI/CD environment where you don't actually commit any changes.
|
|
|
|
#### Filtering DRC and ERC errors
|
|
|
|
Sometimes KiCad reports DRC or ERC errors that you can't get rid off.
|
|
This could be just because you are part of a team including lazy people that doesn't want to take the extra effort to solve
|
|
some errors that aren't in fact errors, just small violations made on purpose. In this case you could exclude some known errors.
|
|
|
|
For this you must declare `filters` entry in the `preflight` section. Then you can add as many `filter` entries as you want.
|
|
Each filter entry has an optional description and defines to which error type is applied (`number`) and a regular expression
|
|
that the error must match to be ignored (`regex`). Like this:
|
|
|
|
```yaml
|
|
filters:
|
|
- filter: 'Optional filter description'
|
|
error: 'Error_type'
|
|
regex: 'Expression to match'
|
|
```
|
|
|
|
Here is a KiCad 5 example, suppose you are getting the following errors:
|
|
|
|
```
|
|
** Found 1 DRC errors **
|
|
ErrType(4): Track too close to pad
|
|
@(177.185 mm, 78.315 mm): Track 1.000 mm [Net-(C3-Pad1)] on F.Cu, length: 1.591 mm
|
|
@(177.185 mm, 80.715 mm): Pad 2 of C3 on F.Cu and others
|
|
|
|
** Found 1 unconnected pads **
|
|
ErrType(2): Unconnected items
|
|
@(177.185 mm, 73.965 mm): Pad 2 of C4 on F.Cu and others
|
|
@(177.185 mm, 80.715 mm): Pad 2 of C3 on F.Cu and others
|
|
```
|
|
|
|
And you want to ignore them. You can add the following filters:
|
|
|
|
```yaml
|
|
filters:
|
|
- filter: 'Ignore C3 pad 2 too close to anything'
|
|
error: '4'
|
|
regex: 'Pad 2 of C3'
|
|
- filter: 'Ignore unconnected pad 2 of C4'
|
|
error: '2'
|
|
regex: 'Pad 2 of C4'
|
|
```
|
|
|
|
If you need to match text from two different lines in the error message try using `(?s)TEXT(.*)TEXT_IN_OTHER_LINE`.
|
|
|
|
If you have two or more different options for a text to match try using `(OPTION1|OPTION2)`.
|
|
|
|
A complete Python regular expressions explanation is out of the scope of this manual. For a complete reference consult the [Python manual](https://docs.python.org/3/library/re.html).
|
|
|
|
KiCad 6 uses strings to differentiate errors, use them for the `error` field. To keep compatibility you can use the `number` or `error_number` options for KiCad 5.
|
|
|
|
Note that this will ignore the errors, but they will be reported as warnings.
|
|
If you want to suppress these warnings take a look at [Filtering KiBot warnings](#filtering-kibot-warnings)
|
|
|
|
**Important note**: this will create a file named *kibot_errors.filter* in the output directory.
|
|
|
|
|
|
### Default global options
|
|
|
|
The section `global` contains default global options that affects all the outputs.
|
|
Currently only a few option are supported.
|
|
|
|
#### Default *output* option
|
|
|
|
This option controls the default file name pattern used by all the outputs. This makes all the file names coherent.
|
|
You can always choose the file name for a particular output.
|
|
|
|
The pattern uses the following expansions:
|
|
|
|
- **%c** company from pcb/sch metadata.
|
|
- **%C`n`** comments line `n` from pcb/sch metadata.
|
|
- **%d** pcb/sch date from metadata if available, file modification date otherwise.
|
|
- **%D** date the script was started.
|
|
- **%f** original pcb/sch file name without extension.
|
|
- **%F** original pcb/sch file name without extension. Including the directory part of the name.
|
|
- **%g** the `file_id` of the global variant.
|
|
- **%G** the `name` of the global variant.
|
|
- **%i** a contextual ID, depends on the output type.
|
|
- **%I** an ID defined by the user for this output.
|
|
- **%M** directory where the pcb/sch resides. Only the last component i.e. /a/b/c/name.kicad_pcb -> c
|
|
- **%p** title from pcb/sch metadata.
|
|
- **%r** revision from pcb/sch metadata.
|
|
- **%S** sub-PCB name (related to multiboards).
|
|
- **%T** time the script was started.
|
|
- **%x** a suitable extension for the output type.
|
|
- **%v** the `file_id` of the current variant, or the global variant if outside a variant scope.
|
|
- **%V** the `name` of the current variant, or the global variant if outside a variant scope.
|
|
|
|
They are compatible with the ones used by IBoM.
|
|
The default value for `global.output` is `%f-%i%I%v.%x`.
|
|
If you want to include the revision you could add the following definition:
|
|
|
|
```yaml
|
|
global:
|
|
output: '%f_rev_%r-%i.%x'
|
|
```
|
|
|
|
Note that the following patterns: **%c**, **%C`n`**, **%d**, **%f**, **%F**, **%p** and **%r** depends on the context.
|
|
If you use them for an output related to the PCB these values will be obtained from the PCB.
|
|
If you need to force the origin of the data you can use **%bX** for the PCB and **%sX** for the schematic, where
|
|
**X** is the pattern to expand.
|
|
|
|
You can also use text variables (introduced in KiCad 6). To expand a text variable use `${VARIABLE}`.
|
|
In addition you can also use environment variables, defined in your OS shell or defined in the `global` section.
|
|
|
|
#### Default *dir* option
|
|
|
|
The default `dir` value for any output is `.`. You can change it here.
|
|
|
|
Expansion patterns are allowed.
|
|
|
|
Note that you can use this value as a base for output's `dir` options. In this case the value defined in the `output` must start with `+`.
|
|
In this case the `+` is replaced by the default `dir` value defined here.
|
|
|
|
#### Default *variant* option
|
|
|
|
This option controls the default variant applied to all the outputs. Example:
|
|
|
|
```yaml
|
|
global:
|
|
variant: 'production'
|
|
```
|
|
|
|
#### Default *units* option
|
|
|
|
This option controls the default value for the `position` and `bom` outputs.
|
|
If you don't define it then the internal defaults of each output are applied. But when you define it the default is the defined value.
|
|
|
|
On KiCad 6 the dimensions has units. When you create a new dimension it uses *automatic* units. This means that KiCad uses the units currently selected.
|
|
This selection isn't stored in the PCB file. The global `units` value is used by KiBot instead.
|
|
|
|
#### Output directory option
|
|
|
|
The `out_dir` option can define the base output directory. This is the same as the `-d`/`--out-dir` command line option.
|
|
Note that the command line option has precedence over it.
|
|
|
|
Expansion patterns are applied to this value, but you should avoid using patterns that expand according to the context, i.e. **%c**, **%d**, **%f**, **%F**, **%p** and **%r**.
|
|
The behavior of these patterns isn't fully defined in this case and the results may change in the future.
|
|
|
|
You can also use text variables (introduced in KiCad 6). To expand a text variable use `${VARIABLE}`.
|
|
In addition you can also use environment variables, defined in your OS shell or defined in the `global` section.
|
|
|
|
#### Date format option
|
|
|
|
* The **%d**, **%sd** and **%bd** patterns use the date and time from the PCB and schematic.
|
|
When abscent they use the file timestamp, and the `date_time_format` global option controls the format used.
|
|
When available, and in ISO format, the `date_format` controls the format used.
|
|
You can disable this reformatting assigning `false` to the `date_reformat` option.
|
|
* The **%D** format is controlled by the `date_format` global option.
|
|
* The **%T** format is controlled by the `time_format` global option.
|
|
|
|
In all cases the format is the one used by the `strftime` POSIX function, for more information visit this [site](https://strftime.org/).
|
|
|
|
#### PCB details options
|
|
|
|
The following variables control the default colors and they are used for documentation purposes:
|
|
|
|
- `pcb_material` [FR4] PCB core material.
|
|
Currently known are FR1 to FR5
|
|
- `solder_mask_color` [green] Color for the solder mask.
|
|
Currently known are green, black, white, yellow, purple, blue and red.
|
|
- `silk_screen_color` [white] Color for the markings.
|
|
Currently known are black and white.
|
|
- `pcb_finish` [HAL] Finishing used to protect pads.
|
|
Currently known are None, HAL, HASL, ENIG and ImAg.
|
|
|
|
#### Filtering KiBot warnings
|
|
|
|
KiBot warnings are marked with `(Wn)` where *n* is the warning id.
|
|
|
|
Some warnings are just recommendations and you could want to avoid them to focus on details that are more relevant to your project.
|
|
In this case you can define filters in a similar way used to [filter DRC/ERC errors](#filtering-drc-and-erc-errors).
|
|
|
|
As an example, if you have the following warning:
|
|
|
|
```
|
|
WARNING:(W43) Missing component `l1:FooBar`
|
|
```
|
|
|
|
You can create the following filter to remove it:
|
|
|
|
```yaml
|
|
global:
|
|
filters:
|
|
- number: 43
|
|
regex: 'FooBar'
|
|
```
|
|
|
|
#### All available global options
|
|
|
|
global:
|
|
@global_options@
|
|
|
|
### Filters and variants
|
|
|
|
The filters and variants are mechanisms used to modify the circuit components.
|
|
Both concepts are closely related. In fact variants can use filters.
|
|
|
|
The current implementation of the filters allow to exclude components from some of the processing stages. The most common use is to exclude them from some output.
|
|
You can also change components fields/properties and also the 3D model.
|
|
|
|
Variants are currently used to create *assembly variants*. This concept is used to manufacture one PCB used for various products.
|
|
You can learn more about KiBot variants on the following [example repo](https://inti-cmnb.github.io/kibot_variants_arduprog/).
|
|
The example is currently using KiCad 6, if you want to see the example files for KiCad 5 go [here](https://github.com/INTI-CMNB/kibot_variants_arduprog/tree/KiCad5/).
|
|
|
|
As mentioned above the current use of filters is to mark some components. Mainly to exclude them, but also to mark them as special.
|
|
This is the case of *do not change* components in the BoM.
|
|
|
|
Filters and variants are defined in separated sections. A filter section looks like this:
|
|
|
|
```yaml
|
|
filters:
|
|
- name: 'a_short_name'
|
|
type: 'generic'
|
|
comment: 'A description'
|
|
# Filter options
|
|
```
|
|
|
|
#### @filters@
|
|
|
|
|
|
#### Examples for filters
|
|
|
|
The [tests/yaml_samples](https://github.com/INTI-CMNB/KiBot/tree/master/tests/yaml_samples) directory contains all the regression tests. Many of them test the filters functionality.
|
|
|
|
- [int_bom_exclude_any.kibot.yaml](https://github.com/INTI-CMNB/KiBot/tree/master/tests/yaml_samples/int_bom_exclude_any.kibot.yaml): Shows how to use regular expressions to match fields and exclude components. Is the more powerful filter mechanism.
|
|
- [int_bom_fil_1.kibot.yaml](https://github.com/INTI-CMNB/KiBot/tree/master/tests/yaml_samples/int_bom_fil_1.kibot.yaml): Shows various mechanisms. In particular how to change the list of keywords, usually used to match 'DNF', meaning you can exclude components with arbitrary text.
|
|
- [int_bom_fil_2.kibot.yaml](https://github.com/INTI-CMNB/KiBot/tree/master/tests/yaml_samples/int_bom_fil_2.kibot.yaml): Shows how to use KiCad 5 module attributes (from the PCB) to filter SMD, THT and Virtual components. Note KiCad 6 is redefining the attributes.
|
|
- [int_bom_include_only.kibot.yaml](https://github.com/INTI-CMNB/KiBot/tree/master/tests/yaml_samples/int_bom_include_only.kibot.yaml): Shows how to use regular expressions to match only some components, instead of including a few.
|
|
- [int_bom_var_t2is_csv.kibot.yaml](https://github.com/INTI-CMNB/KiBot/tree/master/tests/yaml_samples/int_bom_var_t2is_csv.kibot.yaml): Shows how to use filters and variants simultaneously, not a good idea, but possible.
|
|
- [print_pdf_no_inductors_1.kibot.yaml](https://github.com/INTI-CMNB/KiBot/tree/master/tests/yaml_samples/print_pdf_no_inductors_1.kibot.yaml): Shows how to change the `dnf_filter` for a KiBoM variant.
|
|
- [print_pdf_no_inductors_2.kibot.yaml](https://github.com/INTI-CMNB/KiBot/tree/master/tests/yaml_samples/print_pdf_no_inductors_2.kibot.yaml): Shows how to do what `print_pdf_no_inductors_1.kibot.yaml` does but without the need of a variant.
|
|
|
|
#### Built-in filters
|
|
|
|
- **_datasheet_link** converts Datasheet fields containing URLs into HTML links
|
|
- **_expand_text_vars** is a default `expand_text_vars` filter
|
|
- **_kibom_dnc_Config** it uses the internal `dnc_list` to exclude components with
|
|
- Value matching any of the keys
|
|
- Any of the keys in the `Config` field (comma or space separated)
|
|
- **_kibom_dnf_Config** it uses the internal `dnf_list` to exclude components with
|
|
- Value matching any of the keys
|
|
- Any of the keys in the `Config` field (comma or space separated)
|
|
- **_kicost_dnp** used emulate the way KiCost handles the `dnp` field.
|
|
- If the field is 0 the component is included, otherwise excluded.
|
|
- **_kicost_rename** is a `field_rename` filter that applies KiCost renamings.
|
|
- Includes all `manf#` and `manf` variations supported by KiCost
|
|
- Includes all distributor part number variations supported by KiCost
|
|
- 'version' -> 'variant'
|
|
- 'nopop' -> 'dnp'
|
|
- 'description' -> 'desc'
|
|
- 'pdf' -> 'datasheet'
|
|
- **_mechanical** is used to exclude:
|
|
- References that start with #
|
|
- Virtual components
|
|
- References that match: '^TP[0-9]*' or '^FID'
|
|
- Part names that match: 'regex': 'mount.*hole' or 'solder.*bridge' or 'solder.*jump' or 'test.*point'
|
|
- Footprints that match: 'test.*point' or 'mount.*hole' or 'fiducial'
|
|
- **_none** does nothing, useful when you want to remove a filter with default value
|
|
- **_only_smd** is used to get only SMD parts
|
|
- **_only_tht** is used to get only THT parts
|
|
- **_only_virtual** is used to get only virtual parts
|
|
- **_rot_footprint** is a default `rot_footprint` filter
|
|
- **_value_split** splits the Value field but the field remains and the extra data is not visible
|
|
- **_value_split_replace** splits the Value field and replaces it
|
|
- **_var_rename** is a default `var_rename` filter
|
|
- **_var_rename_kicost** is a default `var_rename_kicost` filter
|
|
|
|
Note that the **_kibom_...** filters uses a field named `Config`, but you can customise them invoking **_kibom_dnf_FIELD**. This will create an equivalent filter, but using the indicated **FIELD**.
|
|
|
|
|
|
#### @variants@
|
|
|
|
|
|
#### Changing the 3D model, simple mechanism
|
|
|
|
This mechanism allows small changes to the 3D model. Is simple to use, but the information is located in the schematic.
|
|
|
|
If a component defines the field `_3D_model` then its value will replace the 3D model.
|
|
You can use `var_rename` or `var_rename_kicost` filter to define this field only for certain variants.
|
|
In this way you can change the 3D model according to the component variant.
|
|
|
|
When the component has more than one 3D model you must provide a comma separated list of models to replace the current models.
|
|
|
|
#### Changing the 3D model, complex mechanism
|
|
|
|
When the a component has a long list of 3D models and you want to keep all the information in the PCB you can use this mechanism.
|
|
|
|
The information is stored in the `Text items` of the footprint. If you want to change the 3D models for certain variant you must add an item containing:
|
|
|
|
```
|
|
%VARIANT_NAME:SLOT1,SLOT2,SLOTN%
|
|
```
|
|
|
|
Where `VARIANT_NAME` is the name of the variant that will change the list of 3D models.
|
|
The `SLOT1,SLOT2,SLOTN` is a comma separated list of 3D model positions in the list of 3D models.
|
|
All the slots listed will be enabled, the rest will be disabled.
|
|
|
|
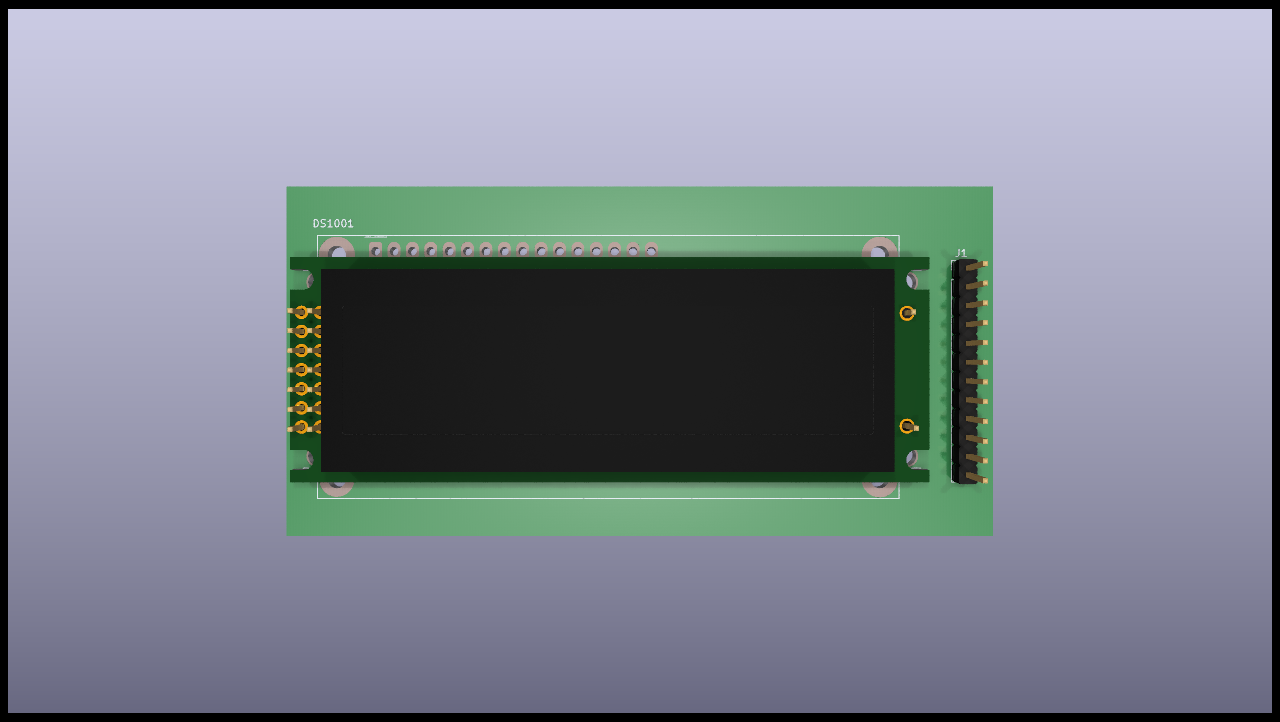
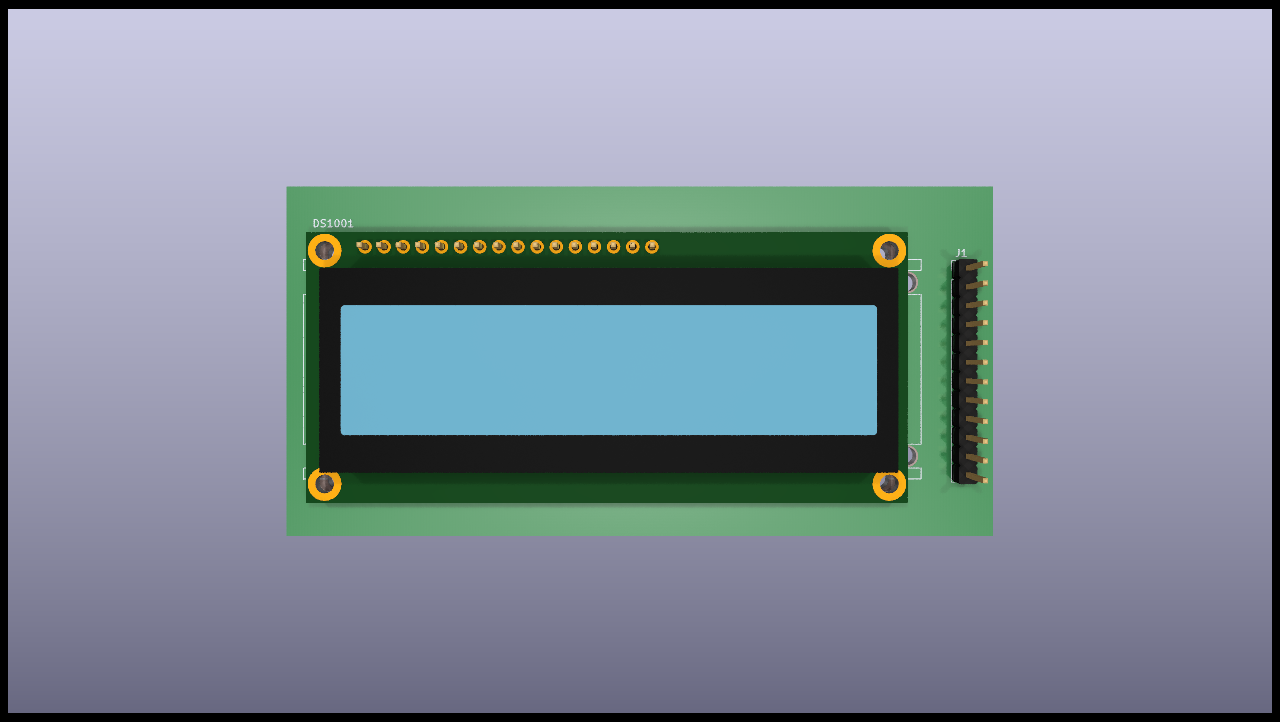
Here is an [example](https://github.com/INTI-CMNB/KiBot/tree/master/docs/samples/3D_Model_LCD).
|
|
In this example we have a display whose aspect and connectio can radically change according to the variant.
|
|
We have two variants:
|
|
|
|
- `left`, uses a ERM1602DNS-2.1 with a connector on the left and two other pins on the right
|
|
- `top`, uses a WH1602B-TMI-JT# with a single connector on the top
|
|
|
|
We have the following list of 3D models:
|
|
|
|
```
|
|
${KISYS3DMOD}/Connector_PinHeader_2.54mm.3dshapes/PinHeader_2x07_P2.54mm_Vertical.wrl
|
|
${KISYS3DMOD}/Connector_PinHeader_2.54mm.3dshapes/PinHeader_1x16_P2.54mm_Vertical.wrl
|
|
${KISYS3DMOD}/Connector_PinHeader_2.54mm.3dshapes/PinHeader_1x01_P2.54mm_Vertical.wrl
|
|
${KISYS3DMOD}/Connector_PinHeader_2.54mm.3dshapes/PinHeader_1x01_P2.54mm_Vertical.wrl
|
|
${KIPRJMOD}/steps/WH1602B-TMI-JT#.step
|
|
${KIPRJMOD}/steps/ERM1602DNS-2.1.step
|
|
```
|
|
|
|
The ERM1602DNS-2.1 uses slots 1, 3, 4 and 6. So the effective list will be:
|
|
|
|
```
|
|
${KISYS3DMOD}/Connector_PinHeader_2.54mm.3dshapes/PinHeader_2x07_P2.54mm_Vertical.wrl
|
|
${KISYS3DMOD}/Connector_PinHeader_2.54mm.3dshapes/PinHeader_1x01_P2.54mm_Vertical.wrl
|
|
${KISYS3DMOD}/Connector_PinHeader_2.54mm.3dshapes/PinHeader_1x01_P2.54mm_Vertical.wrl
|
|
${KIPRJMOD}/steps/ERM1602DNS-2.1.step
|
|
```
|
|
|
|
The WH1602B-TMI-JT# uses slots 2 and 5. So the effective list will be:
|
|
|
|
```
|
|
${KISYS3DMOD}/Connector_PinHeader_2.54mm.3dshapes/PinHeader_1x16_P2.54mm_Vertical.wrl
|
|
${KIPRJMOD}/steps/WH1602B-TMI-JT#.step
|
|
```
|
|
|
|
To achieve it we define the following texts in the footprint: `%left:1,3,4,6%` and `%top:2,5%`.
|
|
Here are both variants:
|
|
|
|
|
|
|
|
|
|
|
|
If you preffer to use the variant specific matching mechanism you can use the following syntax:
|
|
|
|
```
|
|
$TEXT_TO_MATCH:SLOT1,SLOT2,SLOTN$
|
|
```
|
|
|
|
In this case the variant will be applied to the `TEXT_TO_MATCH`, if it matches (equivalent to a component fitted) the `SLOT` will be used.
|
|
|
|
Some important notes:
|
|
- If you want to control what models are used when no variant is used you'll need to create a `default` variant.
|
|
This is what the above example does. In this case the `default` variant shows all the connectors, but no display.
|
|
Note that changing the 3D model needs the variants infrastructure.
|
|
- If you are using variants and a lot of them select the same slots you can add a special text: `%_default_:SLOTS%`.
|
|
This will be used if none %VARIANT_NAME:SLOT%` matched.
|
|
- If you want to disable a model and avoid any kind of warning add `_Disabled_by_KiBot` to the 3D model path.
|
|
This could be needed if you want to remove some model and you don't want to adjust the slot numbers.
|
|
- This mechanism can be used with any of the available variants. For this reason we use the `VARIANT_NAME` and we
|
|
avoid relying on any variant specific mechanism. But you can use the alternative syntax if you preffer the variant
|
|
specific matching system.
|
|
|
|
#### DNF and DNC internal keys
|
|
|
|
The current list of **DNF** keys is:
|
|
- dnf
|
|
- dnl
|
|
- dnp
|
|
- do not fit
|
|
- do not place
|
|
- do not load
|
|
- nofit
|
|
- nostuff
|
|
- noplace
|
|
- noload
|
|
- not fitted
|
|
- not loaded
|
|
- not placed
|
|
- no stuff
|
|
|
|
The current list of **DNC** keys is:
|
|
- dnc
|
|
- do not change
|
|
- no change
|
|
- fixed
|
|
|
|
You can define your own lists as the `int_bom_fil_1.kibot.yaml` shows.
|
|
|
|
|
|
### The *outputs* section
|
|
|
|
In this section you put all the things that you want to generate.
|
|
This section contains one or more **outputs**.
|
|
Each output contain the following data:
|
|
|
|
- `name` a name so you can easily identify it.
|
|
- `comment` a short description of this output.
|
|
- `type` selects which type of output will be generated.
|
|
Examples are *gerbers*, *drill files* and *pick & place files*
|
|
- `dir` is the directory where this output will be stored.
|
|
- `extends` used to use another output's `options` as base.
|
|
- `run_by_default` indicates this output will be created when no specific outputs are requested.
|
|
- `disable_run_by_default` can be used to disable the `run_by_default` status of other output.
|
|
- `output_id` text to use for the %I expansion content.
|
|
- `options` contains one or more options to configure this output.
|
|
- `layers` a list of layers used for this output. Not all outputs needs this subsection.
|
|
|
|
**Important note about the layers**: In the original [kiplot](https://github.com/johnbeard/kiplot)
|
|
(from [John Beard](https://github.com/johnbeard)) the name of the inner layers was *Inner.N* where
|
|
*N* is the number of the layer, i.e. *Inner.1* is the first inner layer.
|
|
This format is supported for compatibility.
|
|
Note that this generated a lot of confusion because the default KiCad name for the first inner layer
|
|
is *In1.Cu*.
|
|
People filled issues and submitted pull-requests to fix it, thinking that inner layers weren't supported.
|
|
Currently KiCad allows renaming these layers, so this version of kiplot supports the name used in
|
|
KiCad. Just use the same name you see in the user interface.
|
|
|
|
The available values for *type* are:
|
|
- Plot formats:
|
|
- `gerber` the gerbers for fabrication.
|
|
- `ps` postscript plot
|
|
- `hpgl` format for laser printers
|
|
- `svg` scalable vector graphics
|
|
- `pdf` portable document format
|
|
- `dxf` mechanical CAD format
|
|
- Drill formats:
|
|
- `excellon` data for the drilling machine
|
|
- `gerb_drill` drilling positions in a gerber file
|
|
- Pick & place
|
|
- `position` of the components for the pick & place machine
|
|
- Documentation
|
|
- `pdf_sch_print` schematic in PDF format
|
|
- `svg_sch_print` schematic in SVG format
|
|
- `ps_sch_print` schematic in PS format
|
|
- `dxf_sch_print` schematic in DXF format
|
|
- `hpgl_sch_print` schematic in HPGL format
|
|
- `pdf_pcb_print` PDF file containing one or more layer and the page frame
|
|
- `svg_pcb_print` SVG file containing one or more layer and the page frame
|
|
- `pcb_print` PDF/SVG/PNG/EPS/PS, similar to `pdf_pcb_print` and `svg_pcb_print`, with more flexibility
|
|
- `report` generates a report about the PDF. Can include images from the above outputs.
|
|
- `diff` creates PDF files showing schematic or PCB changes.
|
|
- Bill of Materials
|
|
- `bom` The internal BoM generator.
|
|
- `kibom` BoM in HTML or CSV format generated by [KiBoM](https://github.com/INTI-CMNB/KiBoM)
|
|
- `ibom` Interactive HTML BoM generated by [InteractiveHtmlBom](https://github.com/INTI-CMNB/InteractiveHtmlBom)
|
|
- `kicost` BoM in XLSX format with costs generated by [KiCost](https://github.com/INTI-CMNB/KiCost)
|
|
- 3D model:
|
|
- `step` *Standard for the Exchange of Product Data* for the PCB
|
|
- `vrml` *Virtual Reality Modeling Language* for the PCB
|
|
- `render_3d` PCB render, from the KiCad's 3D Viewer
|
|
- `blender_export` PCB export to Blender and high quality 3D render.
|
|
Including export to: `fbx` (Kaydara's Filmbox), 'obj' (Wavefront), 'x3d' (ISO/IEC standard),
|
|
`gltf` (GL format), `stl` (3D printing) and 'ply' (Stanford).
|
|
- Web pages:
|
|
- `populate` To create step-by-step assembly instructions.
|
|
- `kikit_present` To create a project presentation web page.
|
|
- `navigate_results` generates web pages to navigate the generated outputs.
|
|
- Fabrication helpers:
|
|
- `panelize` creates a PCB panel containing N copies of the PCB.
|
|
- `stencil_3d` creates a 3D self-registering printable stencil.
|
|
- `stencil_for_jig` creates steel stencils and 3D register.
|
|
- Others:
|
|
- `boardview` creates a file useful to repair the board, but without disclosing the full layout.
|
|
- `gencad` exports the PCB in GENCAD format.
|
|
- `compress` creates an archive containing generated data.
|
|
- `download_datasheets` downloads the datasheets for all the components.
|
|
- `pcbdraw` nice images of the PCB in customized colors.
|
|
- `pdfunite` joins various PDF files into one.
|
|
- `qr_lib` generates symbol and footprints for QR codes.
|
|
- `sch_variant` the schematic after applying all filters and variants, including crossed components.
|
|
- `pcb_variant` the PCB after applying all filters and variants, including modified 3D models.
|
|
- `copy_files` used to copy generated files and source material.
|
|
- `info` creates a report about the tools used during the KiBot run.
|
|
- `netlist` generates the list of connections for the project (classic and IPC-D-356 formats).
|
|
|
|
Here is an example of a configuration file to generate the gerbers for the top and bottom layers:
|
|
|
|
```yaml
|
|
kibot:
|
|
version: 1
|
|
|
|
preflight:
|
|
run_drc: true
|
|
|
|
outputs:
|
|
|
|
- name: 'gerbers'
|
|
comment: "Gerbers for the board house"
|
|
type: gerber
|
|
dir: gerberdir
|
|
options:
|
|
# generic layer options
|
|
exclude_edge_layer: false
|
|
exclude_pads_from_silkscreen: false
|
|
plot_sheet_reference: false
|
|
plot_footprint_refs: true
|
|
plot_footprint_values: true
|
|
force_plot_invisible_refs_vals: false
|
|
tent_vias: true
|
|
line_width: 0.15
|
|
|
|
# gerber options
|
|
use_aux_axis_as_origin: false
|
|
subtract_mask_from_silk: true
|
|
use_protel_extensions: false
|
|
gerber_precision: 4.5
|
|
create_gerber_job_file: true
|
|
use_gerber_x2_attributes: true
|
|
use_gerber_net_attributes: false
|
|
|
|
layers:
|
|
- 'F.Cu'
|
|
- 'B.Cu'
|
|
```
|
|
|
|
Most options are the same you'll find in the KiCad dialogs.
|
|
|
|
Outputs are generated in the order they are declared in the YAML file.
|
|
To create them in an arbitrary order use the `--cli-order` command line option and they will be created in the order specified in the command line.
|
|
|
|
|
|
#### Specifying the layers
|
|
|
|
You have various ways to specify the layers. If you need to specify just one layer you can just use its name:
|
|
|
|
```yaml
|
|
layers: 'F.Cu'
|
|
```
|
|
|
|
If you want to specify all the available layers:
|
|
|
|
```yaml
|
|
layers: 'all'
|
|
```
|
|
|
|
You can also select the layers you want in KiCad (using File, Plot dialog) and save your PCB.
|
|
Then you just need to use:
|
|
|
|
```yaml
|
|
layers: 'selected'
|
|
```
|
|
|
|
You can also use any of the following grup of layers:
|
|
|
|
- **copper** all the copper layers
|
|
- **technical** all the technical layers (silk sreen, solder mask, paste, adhesive, etc.)
|
|
- **user** all the user layers (draw, comments, eco, margin, edge cuts, etc.)
|
|
|
|
You can also mix the above definitions using a list:
|
|
|
|
```yaml
|
|
layers:
|
|
- 'copper'
|
|
- 'Dwgs.User'
|
|
```
|
|
|
|
This will select all the copper layers and the user drawings.
|
|
Note that the above mentioned options will use file name suffixes and descriptions selected automatically.
|
|
If you want to use a particular suffix and provide better descriptions you can use the following format:
|
|
|
|
```yaml
|
|
layers:
|
|
- layer: 'F.Cu'
|
|
suffix: 'F_Cu'
|
|
description: 'Front copper'
|
|
- layer: 'B.Cu'
|
|
suffix: 'B_Cu'
|
|
description: 'Bottom copper'
|
|
```
|
|
|
|
You can also mix the styles:
|
|
|
|
```yaml
|
|
layers:
|
|
- 'copper'
|
|
- layer: 'Cmts.User'
|
|
suffix: 'Cmts_User'
|
|
description: 'User comments'
|
|
- 'Dwgs.User'
|
|
```
|
|
|
|
If you need to use the same list of layers for various outputs you can use YAML anchors.
|
|
The first time you define the list of layers just assign an anchor, here is an example:
|
|
|
|
```yaml
|
|
layers: &copper_and_cmts
|
|
- copper
|
|
- 'Cmts.User'
|
|
```
|
|
|
|
Next time you need this list just use an alias, like this:
|
|
|
|
```yaml
|
|
layers: *copper_and_cmts
|
|
```
|
|
|
|
#### @outputs@
|
|
|
|
#### Consolidating BoMs
|
|
|
|
Some times your project is composed by various boards, other times you are producing various products at the same time.
|
|
In both cases you would want to consolidate the components acquisition in one operation.
|
|
Of course you can create individual BoMs for each project in CSV format and then consolidate them using a spreadsheet editor.
|
|
But KiBot offers another option: you create a BoM for your main project and then aggregate the components from the other projects.
|
|
|
|
Here is a simple example. Suppose you have three projects: *merge_1*, *merge_2* and *merge_3*.
|
|
For the *merge_1* project you could use the following output:
|
|
|
|
```yaml
|
|
kibot:
|
|
version: 1
|
|
|
|
outputs:
|
|
- name: 'bom_csv'
|
|
comment: "Bill of Materials in CSV format"
|
|
type: bom
|
|
dir: BoM
|
|
options:
|
|
use_alt: true
|
|
```
|
|
|
|
Using the `tests/board_samples/kicad_5/merge_1.sch` from the git repo and storing the above example in `m1.kibot.yaml` you could run:
|
|
|
|
```shell
|
|
src/kibot -c m1.kibot.yaml -e tests/board_samples/kicad_5/merge_1.sch -d test_merge
|
|
```
|
|
|
|
And get `test_merge/BoM/merge_1-bom.csv`:
|
|
|
|
| Row | Description | Part | References | Value | Footprint | Quantity Per PCB | Status | Datasheet |
|
|
|--------------------|-----------------------------------|------|------------|-------|-----------|------------------|--------|-----------|
|
|
| 1 | Unpolarized capacitor | C | C1 | 1nF | | 1 | | ~ |
|
|
| 2 | Unpolarized capacitor | C | C2 | 10nF | | 1 | | ~ |
|
|
| 3 | Resistor | R | R1-R3 | 1k | | 3 | | ~ |
|
|
|
|
| Project info: | |
|
|
|--------------------|-----------------------------------|
|
|
| Schematic: | merge_1 |
|
|
| Variant: | default |
|
|
| Revision: | |
|
|
| Date: | 2021-02-02_12-12-27 |
|
|
| KiCad Version: | 5.1.9-73d0e3b20d\~88\~ubuntu21.04.1 |
|
|
| Statistics: | |
|
|
| Component Groups: | 3 |
|
|
| Component Count: | 5 |
|
|
| Fitted Components: | 5 |
|
|
| Number of PCBs: | 1 |
|
|
| Total Components: | 5 |
|
|
|
|
This CSV says you have five components groped in three different types.
|
|
They are one 1 nF capacitor, one 10 nF capacitor and three 1 k resistors.
|
|
Now lets generate BoMs for the *merge_2* example:
|
|
|
|
```shell
|
|
src/kibot -c m1.kibot.yaml -e tests/board_samples/kicad_5/merge_2.sch -d test_merge
|
|
```
|
|
|
|
We'll get `test_merge/BoM/merge_2-bom.csv`:
|
|
|
|
| Row | Description | Part | References | Value | Footprint | Quantity Per PCB | Status | Datasheet |
|
|
|--------------------|-----------------------------------|------|------------|-------|-----------|------------------|--------|-----------|
|
|
| 1 | Unpolarized capacitor | C | C2 | 1nF | | 1 | | ~ |
|
|
| 2 | Unpolarized capacitor | C | C1 | 10nF | | 1 | | ~ |
|
|
| 3 | Resistor | R | R2-R4 | 1000 | | 3 | | ~ |
|
|
| 4 | Resistor | R | R1 | 10k | | 1 | | ~ |
|
|
|
|
| Project info: | |
|
|
|--------------------|-----------------------------------|
|
|
| Schematic: | merge_2 |
|
|
| Variant: | default |
|
|
| Revision: | |
|
|
| Date: | 2021-01-27_10-19-46 |
|
|
| KiCad Version: | 5.1.9-73d0e3b20d\~88\~ubuntu21.04.1 |
|
|
| Statistics: | |
|
|
| Component Groups: | 4 |
|
|
| Component Count: | 6 |
|
|
| Fitted Components: | 6 |
|
|
| Number of PCBs: | 1 |
|
|
| Total Components: | 6 |
|
|
|
|
In this project we have six components from four different types.
|
|
They are similar to *merge_1* but now we also have a 10 k resistor.
|
|
We don't need to generate this BoM to consolidate our projects, but is good to know what we have.
|
|
And now lets generate BoMs for the *merge_3* example:
|
|
|
|
```shell
|
|
src/kibot -c m1.kibot.yaml -e tests/board_samples/kicad_5/merge_3.sch -d test_merge
|
|
```
|
|
|
|
We'll get `test_merge/BoM/merge_3-bom.csv`:
|
|
|
|
| Row | Description | Part | References | Value | Footprint | Quantity Per PCB | Status | Datasheet |
|
|
|--------------------|-----------------------------------|------|------------|-------|-----------|------------------|--------|-----------|
|
|
| 1 | Resistor | R | R5 | 1k | | 1 | | ~ |
|
|
| 2 | Resistor | R | R1-R4 | 10k | | 4 | | ~ |
|
|
|
|
| Project info: | |
|
|
|--------------------|-----------------------------------|
|
|
| Schematic: | merge_3 |
|
|
| Variant: | default |
|
|
| Revision: | |
|
|
| Date: | 2021-01-27_10-21-29 |
|
|
| KiCad Version: | 5.1.9-73d0e3b20d\~88\~ubuntu21.04.1 |
|
|
| Statistics: | |
|
|
| Component Groups: | 2 |
|
|
| Component Count: | 5 |
|
|
| Fitted Components: | 5 |
|
|
| Number of PCBs: | 1 |
|
|
| Total Components: | 5 |
|
|
|
|
This time we also have five components, but from two different types.
|
|
They are one 1 k resistor and four 10 k resistors.
|
|
Now suppose we want to create 10 boards for *merge_1*, 20 for *merge_2* and 30 for *merge_3*.
|
|
We could use the following configuration:
|
|
|
|
```yaml
|
|
kibot:
|
|
version: 1
|
|
|
|
outputs:
|
|
- name: 'bom_csv'
|
|
comment: "Bill of Materials in CSV format"
|
|
type: bom
|
|
dir: BoM
|
|
options:
|
|
use_alt: true
|
|
number: 10
|
|
aggregate:
|
|
- file: tests/board_samples/kicad_5/merge_2.sch
|
|
number: 20
|
|
- file: tests/board_samples/kicad_5/merge_3.sch
|
|
number: 30
|
|
```
|
|
|
|
Save it as `m2.kibot.yaml` and run:
|
|
|
|
```shell
|
|
src/kibot -c m2.kibot.yaml -e tests/board_samples/kicad_5/merge_1.sch -d test_merge_consolidate
|
|
```
|
|
|
|
The `test_merge_consolidate/BoM/merge_1-bom.csv` file will be generated containing:
|
|
|
|
| Row | Description | Part | References | Value | Footprint | Quantity Per PCB | Build Quantity | Status | Datasheet | Source BoM |
|
|
|--------------------|-----------------------------------|------|----------------|-------|-----------|------------------|----------------|--------|-----------|----------------------------------|
|
|
| 1 | Unpolarized capacitor | C | C1 C2 | 1nF | | 2 | 30 | | ~ | merge_1(1) merge_2(1) |
|
|
| 2 | Unpolarized capacitor | C | C2 C1 | 10nF | | 2 | 30 | | ~ | merge_1(1) merge_2(1) |
|
|
| 3 | Resistor | R | R1-R3 R2-R4 R5 | 1k | | 7 | 120 | | ~ | merge_1(3) merge_2(3) merge_3(1) |
|
|
| 4 | Resistor | R | R1 R1-R4 | 10k | | 5 | 140 | | ~ | merge_2(1) merge_3(4) |
|
|
|
|
| Project info: | |
|
|
|--------------------|-----------------------------------|
|
|
| Variant: | default |
|
|
| KiCad Version: | 5.1.9-73d0e3b20d\~88\~ubuntu21.04.1 |
|
|
| Global statistics: | |
|
|
| Component Groups: | 4 |
|
|
| Component Count: | 16 |
|
|
| Fitted Components: | 16 |
|
|
| Number of PCBs: | 60 |
|
|
| Total Components: | 320 |
|
|
| Project info: | merge_1 |
|
|
| Schematic: | merge_1 |
|
|
| Revision: | |
|
|
| Date: | 2021-02-02_12-12-27 |
|
|
| Company: | Test company |
|
|
| Statistics: | merge_1 |
|
|
| Component Groups: | 3 |
|
|
| Component Count: | 5 |
|
|
| Fitted Components: | 5 |
|
|
| Number of PCBs: | 10 |
|
|
| Total Components: | 50 |
|
|
| Project info: | merge_2 |
|
|
| Schematic: | merge_2 |
|
|
| Revision: | |
|
|
| Date: | 2021-01-27_10-19-46 |
|
|
| Statistics: | merge_2 |
|
|
| Component Groups: | 4 |
|
|
| Component Count: | 6 |
|
|
| Fitted Components: | 6 |
|
|
| Number of PCBs: | 20 |
|
|
| Total Components: | 120 |
|
|
| Project info: | merge_3 |
|
|
| Schematic: | merge_3 |
|
|
| Revision: | |
|
|
| Date: | 2021-01-27_10-21-29 |
|
|
| Statistics: | merge_3 |
|
|
| Component Groups: | 2 |
|
|
| Component Count: | 5 |
|
|
| Fitted Components: | 5 |
|
|
| Number of PCBs: | 30 |
|
|
| Total Components: | 150 |
|
|
|
|
You can see that now we have much more stats.
|
|
They say we have four different types, thirteen for board sets, a total of 60 boards and 250 components.
|
|
Then we have individual stats for each project.
|
|
The capacitors are easy to interpret, we have 30 1 nF capacitors *merge_1* project has one and *merge_2* another.
|
|
As we have 10 *merge_1* and 20 *merge_2* boards this is clear.
|
|
But looking at the 1 k resistors is harder. We have 80, three from *merge_1*, one from *merge_2* and another from *merge_3*.
|
|
So we have 10*3+20*3+30=120, this is clear, but the BoM says they are R1-R3 R2-R4 R5, which is a little bit confusing.
|
|
In this simple example is easy to correlate R1-R3 to *merge_1*, R2-R4 to *merge_2* and R5 to *merge_1*.
|
|
For bigger projects this gets harder.
|
|
Lets assign an *id* to each project, we'll use 'A' for *merge_1*, 'B' for *merge_2* and 'C' for *merge_3*:
|
|
|
|
```yaml
|
|
kibot:
|
|
version: 1
|
|
|
|
outputs:
|
|
- name: 'bom_csv'
|
|
comment: "Bill of Materials in CSV format"
|
|
type: bom
|
|
dir: BoM
|
|
options:
|
|
use_alt: true
|
|
number: 10
|
|
ref_id: 'A:'
|
|
aggregate:
|
|
- file: tests/board_samples/kicad_5/merge_2.sch
|
|
number: 20
|
|
ref_id: 'B:'
|
|
- file: tests/board_samples/kicad_5/merge_3.sch
|
|
number: 30
|
|
ref_id: 'C:'
|
|
```
|
|
|
|
Now `test_merge_consolidate/BoM/merge_1-bom.csv` will have the following information:
|
|
|
|
| Row | Description | Part | References | Value | Footprint | Quantity Per PCB | Build Quantity | Status | Datasheet | Source BoM |
|
|
|-----|-----------------------|------|--------------------------|-------|-----------|------------------|----------------|--------|-----------|----------------------------------|
|
|
| 1 | Unpolarized capacitor | C | A:C1 B:C2 | 1nF | | 2 | 30 | | ~ | merge_1(1) merge_2(1) |
|
|
| 2 | Unpolarized capacitor | C | A:C2 B:C1 | 10nF | | 2 | 30 | | ~ | merge_1(1) merge_2(1) |
|
|
| 3 | Resistor | R | A:R1-A:R3 B:R2-B:R4 C:R5 | 1k | | 7 | 120 | | ~ | merge_1(3) merge_2(3) merge_3(1) |
|
|
| 4 | Resistor | R | B:R1 C:R1-C:R4 | 10k | | 5 | 140 | | ~ | merge_2(1) merge_3(4) |
|
|
|
|
As you can see now we know `A` has R1-R3, `B` R2-R4 and for `C` R5 is the 1k resistor.
|
|
If we want to compact the `Source BoM` column we just need to enable the `source_by_id` option:
|
|
|
|
```yaml
|
|
kibot:
|
|
version: 1
|
|
|
|
outputs:
|
|
- name: 'bom_csv'
|
|
comment: "Bill of Materials in CSV format"
|
|
type: bom
|
|
dir: BoM
|
|
options:
|
|
use_alt: true
|
|
number: 10
|
|
ref_id: 'A:'
|
|
source_by_id: true
|
|
aggregate:
|
|
- file: tests/board_samples/kicad_5/merge_2.sch
|
|
number: 20
|
|
ref_id: 'B:'
|
|
- file: tests/board_samples/kicad_5/merge_3.sch
|
|
number: 30
|
|
ref_id: 'C:'
|
|
```
|
|
|
|
And we'll get:
|
|
|
|
| Row | Description | Part | References | Value | Footprint | Quantity Per PCB | Build Quantity | Status | Datasheet | Source BoM |
|
|
|-----|-----------------------|------|--------------------------|-------|-----------|------------------|----------------|--------|-----------|-------------------|
|
|
| 1 | Unpolarized capacitor | C | A:C1 B:C2 | 1nF | | 2 | 30 | | ~ | A:(1) B:(1) |
|
|
| 2 | Unpolarized capacitor | C | A:C2 B:C1 | 10nF | | 2 | 30 | | ~ | A:(1) B:(1) |
|
|
| 3 | Resistor | R | A:R1-A:R3 B:R2-B:R4 C:R5 | 1k | | 7 | 120 | | ~ | A:(3) B:(3) C:(1) |
|
|
| 4 | Resistor | R | B:R1 C:R1-C:R4 | 10k | | 5 | 140 | | ~ | B:(1) C:(4) |
|
|
|
|
|
|
#### Importing outputs from another file
|
|
|
|
In some cases you may want to reuse configuration files. An example of this are the example files that generate gerbers and drill files for various manufacturers ([see](https://github.com/INTI-CMNB/KiBot/tree/master/docs/samples)).
|
|
|
|
In this case you can create a section named `import` containing a list of configuration files. Here is an example:
|
|
|
|
```yaml
|
|
import:
|
|
- configs/Elecrow.kibot.yaml
|
|
- configs/FusionPCB.kibot.yaml
|
|
- configs/JLCPCB.kibot.yaml
|
|
- configs/P-Ban.kibot.yaml
|
|
- configs/PCBWay.kibot.yaml
|
|
```
|
|
|
|
This will import all the outputs from the listed files.
|
|
|
|
|
|
#### Importing other stuff from another file
|
|
|
|
This is a more complex case of the previous [Importing outputs from another file](#importing-outputs-from-another-file).
|
|
In this case you must use the more general syntax:
|
|
|
|
```yaml
|
|
import:
|
|
- file: FILE_CONTAINING_THE_YAML_DEFINITIONS
|
|
outputs: LIST_OF_OUTPUTS
|
|
preflights: LIST_OF_PREFLIGHTS
|
|
filters: LIST_OF_FILTERS
|
|
variants: LIST_OF_VARIANTS
|
|
global: LIST_OF_GLOBALS
|
|
groups: LIST_OF_GROUPS
|
|
```
|
|
|
|
This syntax is flexible. If you don't define which `outputs`, `preflights`, `filters`, `variants`, `global` and/or `groups` all will be imported.
|
|
So you can just omit them, like this:
|
|
|
|
```yaml
|
|
import:
|
|
- file: FILE_CONTAINING_THE_YAML_DEFINITIONS
|
|
```
|
|
|
|
The `LIST_OF_items` can be a YAML list or just one string. Here is an example:
|
|
|
|
```yaml
|
|
import:
|
|
- file: FILE_CONTAINING_THE_YAML_DEFINITIONS
|
|
outputs: one_name
|
|
filters: ['name1', 'name2']
|
|
```
|
|
|
|
This will import the `one_name` output and the `name1` and `name2` filters. As `variants` is omitted, all variants will be imported.
|
|
The same applies to other things like globals and groups.
|
|
You can also use the `all` and `none` special names, like this:
|
|
|
|
```yaml
|
|
import:
|
|
- file: FILE_CONTAINING_THE_YAML_DEFINITIONS
|
|
outputs: all
|
|
filters: all
|
|
variants: none
|
|
global: none
|
|
```
|
|
|
|
This will import all outputs and filters, but not variants or globals.
|
|
Also note that imported globals has more precedence than the ones defined in the same file.
|
|
If you want to give more priority to the local values use:
|
|
|
|
```yaml
|
|
kibot:
|
|
version: 1
|
|
imported_global_has_less_priority: true
|
|
|
|
import:
|
|
...
|
|
```
|
|
|
|
Another important detail is that global options that are lists gets the values merged.
|
|
The last set of values found is inserted at the beginning of the list.
|
|
You can collect filters for all the imported global sections.
|
|
|
|
Imports are processed recursively: An `import` section in an imported
|
|
file is also processed (so importing `A.yaml` that imports `B.yaml`
|
|
effectively imports both).
|
|
|
|
If an import filename is a relative path, it is resolved relative to the
|
|
config file that contains the import (so it works regardless of the
|
|
working directory and, in case of recursive imports, of where top-level
|
|
config lives).
|
|
|
|
It's recommended to always use some file extension in the *FILE_CONTAINING_THE_YAML_DEFINITIONS* name.
|
|
If you don't use any file extension and you use a relative path this name could be confused with an internal template.
|
|
See [Importing internal templates](#importing-internal-templates).
|
|
If you need to use a name without any extension and a relative path, and this name is the same used for a KiBot template use the `is_external` option:
|
|
|
|
```yaml
|
|
import:
|
|
- file: Elecrow
|
|
is_external: true
|
|
```
|
|
|
|
#### Parametrizable imports
|
|
|
|
You can create imports that are parametrizable. For this you must use the mechanism explained in
|
|
the [Doing YAML substitution or preprocessing](#doing-yaml-substitution-or-preprocessing) section.
|
|
|
|
#### Importing internal templates
|
|
|
|
KiBot has some internally defined outputs, groups and filters.
|
|
You can easily use them with the `import` mechanism.
|
|
Use the `file` mechanism and don't include the extension for the file.
|
|
When importing an internal template you don't need to specify its location.
|
|
Here is an example:
|
|
|
|
```yaml
|
|
import:
|
|
- file: Elecrow
|
|
```
|
|
|
|
This will import the definitions for the internal Elecrow configuration.
|
|
Here is a list of currently defined templates:
|
|
|
|
They include support for:
|
|
|
|
- CheckZoneFill: enables the `check_zone_fills` preflight and checks the refilled PCB doesn't changed too much.
|
|
- _diff_cur_pcb_show: Makes a diff between the PCB in memory and the one on disk
|
|
- _diff_cur_pcb_check: Computes the difference between PCB in memory and the one on disk. Aborts if more than
|
|
100 pixels changed.
|
|
- [Elecrow](https://www.elecrow.com/): contain fabrication outputs compatible with Elecrow
|
|
- _Elecrow_gerbers: Gerbers
|
|
- _Elecrow_drill: Drill files
|
|
- _Elecrow_compress: Gerbers and drill files compressed in a ZIP
|
|
- _Elecrow: _Elecrow_gerbers+_Elecrow_drill
|
|
- [FusionPCB](https://www.seeedstudio.io/fusion.html): contain fabrication outputs compatible with FusionPCB
|
|
- _FusionPCB_gerbers: Gerbers
|
|
- _FusionPCB_drill: Drill files
|
|
- _FusionPCB_compress: Gerbers and drill files compressed in a ZIP
|
|
- _FusionPCB: _FusionPCB_gerbers+_FusionPCB_drill
|
|
- [JLCPCB](https://jlcpcb.com/): contain fabrication outputs compatible with JLC PCB.
|
|
Use the `field_lcsc_part` global option to specify the LCSC part number field if KiBot fails to detect it.
|
|
- _JLCPCB_gerbers: Gerbers.
|
|
- _JLCPCB_drill: Drill files
|
|
- _JLCPCB_position: Pick and place, applies the `_rot_footprint` filter. You can change this filter.
|
|
- _JLCPCB_bom: List of LCSC parts, assumes a field named `LCSC#` contains the LCSC codes. You can change this filter.
|
|
- _JLCPCB_compress: Gerbers, drill, position and BoM files compressed in a ZIP
|
|
- _JLCPCB_fab: _JLCPCB_gerbers+_JLCPCB_drill
|
|
- _JLCPCB_assembly: _JLCPCB_position+_JLCPCB_bom
|
|
- _JLCPCB: _JLCPCB_fab+_JLCPCB_assembly
|
|
- [JLCPCB_stencil](https://jlcpcb.com/): Derived from JLCPCB, adds solder paste gerbers for stencils
|
|
- _JLCPCB_gerbers: Gerbers.
|
|
- _JLCPCB_gerbers_stencil: Gerbers for the solder paste stencils. Disabled by default.
|
|
- _JLCPCB_drill: Drill files
|
|
- _JLCPCB_position: Pick and place, applies the `_rot_footprint` filter. You can change this filter.
|
|
- _JLCPCB_bom: List of LCSC parts, assumes a field named `LCSC#` contains the LCSC codes. You can change this filter.
|
|
- _JLCPCB_compress: Gerbers, drill, position and BoM files compressed in a ZIP
|
|
- _JLCPCB_fab: _JLCPCB_gerbers+_JLCPCB_gerbers_stencil+_JLCPCB_drill
|
|
- _JLCPCB_assembly: _JLCPCB_position+_JLCPCB_bom
|
|
- _JLCPCB: _JLCPCB_fab+_JLCPCB_assembly
|
|
- [MacroFab_XYRS](https://help.macrofab.com/knowledge/macrofab-required-design-files): XYRS position file in MacroFab format
|
|
- _macrofab_xyrs: Position file in XYRS format compatible with MacroFab.
|
|
- [P-Ban](https://www.p-ban.com/): contain fabrication outputs compatible with P-Ban
|
|
- _P-Ban_gerbers: Gerbers. You need to define the layers for more than 8.
|
|
- _P-Ban_drill: Drill files
|
|
- _P-Ban: _P-Ban_gerbers+_P-Ban_drill
|
|
- [PCB2Blender_2_1](https://github.com/30350n/pcb2blender)
|
|
- _PCB2Blender_layers_2_1: The layers in SVG format. Disabled by default.
|
|
- _PCB2Blender_vrml_2_1: The VRML for the board. Disabled by default.
|
|
- _PCB2Blender_tools_2_1: Pads and bounds information. Disabled by default.
|
|
- _PCB2Blender_2_1: The PCB3D file. Is enabled and creates the other files.
|
|
- _PCB2Blender_elements_2_1: _PCB2Blender_tools_2_1+_PCB2Blender_layers_2_1+_PCB2Blender_vrml_2_1
|
|
- [PCB2Blender_2_1_haschtl](https://github.com/haschtl/pcb2blender)
|
|
- Imports `PCB2Blender_2_1` and disables `_PCB2Blender_2_1`
|
|
- _PCB2Blender_tools_2_1_haschtl: Pads, bounds and stack-up information. Disabled by default.
|
|
- _PCB2Blender_2_1_haschtl: The PCB3D file. Is enabled and creates the other files.
|
|
- _PCB2Blender_elements_2_1_haschtl: _PCB2Blender_tools_2_1_haschtl+_PCB2Blender_layers_2_1+_PCB2Blender_vrml_2_1
|
|
- [PCBWay](https://www.pcbway.com): contain fabrication outputs compatible with PCBWay
|
|
- _PCBWay_gerbers: Gerbers
|
|
- _PCBWay_drill: Drill files
|
|
- _PCBWay_compress: Gerbers and drill files compressed in a ZIP
|
|
- _PCBWay: _PCBWay_gerbers+_PCBWay_drill
|
|
|
|
|
|
#### Using other output as base for a new one
|
|
|
|
If you need to define an output that is similar to another, and you want to avoid copying the options from the former, you can *extend* an output.
|
|
To achieve it just specify the name of the base output in the `extends` value.
|
|
Note that this will use the `options` of the other output as base, not other data as the comment.
|
|
|
|
Also note that you can use [YAML anchors](https://www.educative.io/blog/advanced-yaml-syntax-cheatsheet#anchors), but this won't work if you are
|
|
importing the base output from other file.
|
|
|
|
Additionally you must be aware that extending an output doesn't disable the base output.
|
|
If you need to disable the original output use `disable_run_by_default` option.
|
|
|
|
|
|
#### Grouping outputs
|
|
|
|
Sometimes you want to generate various outputs together. An example could be the fabrication files, or the documentation for the project.
|
|
|
|
To explain it we will use an example where you have six outputs.
|
|
Three are used for fabrication: `gerbers`, `excellon_drill` and `position`.
|
|
Another three are used for documentation: `SVG`, `PcbDraw` and `PcbDraw2`.
|
|
The YAML config containing this example can be found [here](tests/yaml_samples/groups_1.kibot.yaml).
|
|
If you need to generate the fabrication outputs you must run:
|
|
|
|
```
|
|
kibot gerbers excellon_drill position
|
|
```
|
|
|
|
One mechanism to group the outputs is to create a `compress` output that just includes the outputs you want to group.
|
|
Here is one example:
|
|
|
|
```yaml
|
|
- name: compress_fab
|
|
comment: "Generates a ZIP file with all the fab outputs"
|
|
type: compress
|
|
run_by_default: false
|
|
options:
|
|
files:
|
|
- from_output: gerbers
|
|
- from_output: excellon_drill
|
|
- from_output: position
|
|
```
|
|
|
|
The `compress_fab` output will generate the `gerbers`, `excellon_drill` and `position` outputs.
|
|
Then it will create a ZIP file containing the files generated by these outputs.
|
|
The command line invocation for this is:
|
|
|
|
```
|
|
kibot compress_fab
|
|
```
|
|
|
|
Using this mechanism you are forced to create a compressed output.
|
|
To avoid it you can use `groups`.
|
|
The `groups` section is used to create groups of outputs.
|
|
Here is the example for fabrication files:
|
|
|
|
```yaml
|
|
groups:
|
|
- name: fab
|
|
outputs:
|
|
- gerbers
|
|
- excellon_drill
|
|
- position
|
|
```
|
|
|
|
So now you can just run:
|
|
|
|
```
|
|
kibot fab
|
|
```
|
|
|
|
The `gerbers`, `excellon_drill` and `position` outputs will be generated without the need to generate an extra file.
|
|
Groups can be nested, here is an example:
|
|
|
|
```yaml
|
|
groups:
|
|
- name: fab
|
|
outputs:
|
|
- gerbers
|
|
- excellon_drill
|
|
- position
|
|
- name: plot
|
|
outputs:
|
|
- SVG
|
|
- PcbDraw
|
|
- PcbDraw2
|
|
- name: fab_svg
|
|
outputs:
|
|
- fab
|
|
- SVG
|
|
```
|
|
|
|
Here the `fab_svg` group will contain `gerbers`, `excellon_drill`, `position` and `SVG`.
|
|
|
|
Groups can be imported from another YAML file.
|
|
|
|
Avoid naming groups using `_` as first character. These names are reserved for KiBot.
|
|
|
|
### Doing YAML substitution or preprocessing
|
|
|
|
Sometimes you could want to change values in the YAML depending on external stuff,
|
|
or just want to be able to change something for each variant run.
|
|
|
|
In this case you can use external tools to create various YAML files using a template,
|
|
but you can also use KiBot's definitions.
|
|
|
|
The definitions allows you to replace tags like `@VARIABLE@` by some specified value.
|
|
These definitions can be specified at the command line using the `-E` option.
|
|
As an example: `-E UNITS=millimeters` will replace all `@UNITS@` markers by `millimeters`.
|
|
This is applied to all YAML files loaded, so this propagates to all the imported YAML files.
|
|
|
|
You can use `-E` as many times as you need.
|
|
|
|
#### Default definitions
|
|
|
|
A configuration file using the `@VARIABLE@` tags won't be usable unless you provide proper
|
|
values for **all** de used variables. When using various tags this could be annoying.
|
|
KiBot supports defining default values for the tags. Here is an example:
|
|
|
|
```yaml
|
|
kibot:
|
|
version: 1
|
|
|
|
outputs:
|
|
- name: 'gerbers_@ID@'
|
|
comment: "Gerbers with definitions"
|
|
type: gerber
|
|
output_id: _@ID@
|
|
layers: @LAYERS@
|
|
...
|
|
definitions:
|
|
ID: def_id
|
|
LAYERS: F.Cu
|
|
```
|
|
|
|
Note that from the YAML point this is two documents in the same file. The second document
|
|
is used to provide default values for the definitions. As defaults they have the lowest
|
|
precedence.
|
|
|
|
#### Definitions during import
|
|
|
|
When importing a configuration you can specify values for the `@VARIABLE@` tags. This
|
|
enables the creation of parametrizable imports. Using the example depicted in
|
|
[Default definitions](#default-definitions) saved to a file named *simple.kibot.yaml*
|
|
you can use:
|
|
|
|
```yaml
|
|
kibot:
|
|
version: 1
|
|
|
|
import:
|
|
- file: simple.kibot.yaml
|
|
definitions:
|
|
ID: external_copper
|
|
LAYERS: "[F.Cu, B.Cu]"
|
|
```
|
|
|
|
This will import *simple.kibot.yaml* and use these particular values. Note that they
|
|
have more precedence than the definitions found in *simple.kibot.yaml*, but less
|
|
precedence than any value passed from the command line.
|
|
|
|
#### Recursive definitions expansion
|
|
|
|
When KiBot expands the `@VARIABLE@` tags it first applies all the replacements defined
|
|
in the command line, and then all the values collected from the `definitions`. After
|
|
doing a round of replacements KiBot tries to do another. This process is repeated until
|
|
nothing is replaced or we reach 20 iterations. So you can define a tag that contains
|
|
another tag.
|
|
|
|
As an example, if the configuration shown in [Definitions during import](#definitions-during-import)
|
|
is stored in a file named *top.kibot.yaml* you could use:
|
|
|
|
```shell
|
|
kibot -v -c top.kibot.yaml -E ID=@LAYERS@
|
|
```
|
|
|
|
This will generate gerbers for the front/top and bottom layers using *[F.Cu, B.Cu]* as
|
|
output id. So you'll get *light_control-B_Cu_[F.Cu, B.Cu].gbr* and
|
|
*light_control-F_Cu_[F.Cu, B.Cu].gbr*.
|
|
|
|
## Usage
|
|
|
|
For a quick start just go to the project's dir and run:
|
|
|
|
```shell
|
|
kibot --quick-start
|
|
```
|
|
|
|
This will generate a configuration and generate outputs.
|
|
If you want to just generate the configuration, and not the outputs, use:
|
|
|
|
```shell
|
|
kibot --quick-start --dry
|
|
```
|
|
|
|
If you need a more exhaustive configuration file try:
|
|
|
|
```shell
|
|
kibot --example
|
|
```
|
|
|
|
This will generate a file named `example.kibot.yaml` containing all the available options and comments about them.
|
|
You can use it to create your own configuration file.
|
|
|
|
If you want to use the layers of a particular PCB in the example use:
|
|
|
|
```shell
|
|
kibot -b PCB_FILE --example
|
|
```
|
|
|
|
And if you want to use the same options selected in the plot dialog use:
|
|
|
|
```shell
|
|
kibot -b PCB_FILE -p --example
|
|
```
|
|
|
|
If the current directory contains only one PCB file and only one configuration file (named *.kibot.yaml) you can just call `kibot`.
|
|
No arguments needed.
|
|
The tool will figure out which files to use.
|
|
|
|
If more than one file is found in the current directory `kibot` will use the first found and issue a warning.
|
|
If you need to use other file just tell it explicitly:
|
|
|
|
```shell
|
|
kibot -b PCB_FILE.kicad_pcb -c CONFIG.kibot.yaml
|
|
```
|
|
|
|
A simple target can be added to your `makefile`, so you can just run `make pcb_files` or integrate into your current build process.
|
|
|
|
```Makefile
|
|
pcb_files:
|
|
kibot -b $(PCB) -c $(KIBOT_CFG)
|
|
```
|
|
|
|
If you need to suppress messages use `--quiet` or `-q` and if you need to get more information about what's going on use `--verbose` or `-v`.
|
|
|
|
If you want to generate only some of the outputs use:
|
|
|
|
```shell
|
|
kibot OUTPUT_1 OUTPUT_2
|
|
```
|
|
|
|
If you want to generate all outputs with some exceptions use:
|
|
|
|
|
|
```shell
|
|
kibot --invert-sel OUTPUT_1 OUTPUT_2
|
|
```
|
|
|
|
Note that you can use the `run_by_default` option of the output you want to exclude from the default runs.
|
|
|
|
If you want to skip the DRC and ERC use:
|
|
|
|
```shell
|
|
kibot --skip-pre run_erc,run_drc
|
|
```
|
|
|
|
If you want to skip all the `preflight` tasks use:
|
|
|
|
```shell
|
|
kibot --skip-pre all
|
|
```
|
|
|
|
All outputs are generated using the current directory as base.
|
|
If you want to use another directory as base use:
|
|
|
|
```shell
|
|
kibot --out-dir OTHER_PLACE
|
|
```
|
|
|
|
If you want to list the available outputs defined in the configuration file use:
|
|
|
|
```shell
|
|
kibot --list
|
|
```
|
|
|
|
### Command line help
|
|
|
|
```
|
|
@cmd_help@
|
|
```
|
|
|
|
## Usage for CI/CD
|
|
|
|
When using a GitHub or GitLab repo you can use KiBot to generate all the needed stuff each time you commit a change to the schematic and/or PCB file.
|
|
|
|
If you want a quick demo of what KiBot can do on a GitHub project try the following [workflow](https://github.com/INTI-CMNB/kibot_variants_arduprog/blob/master/.github/workflows/kibot_quick_start.yml).
|
|
You just need to enable GitHub workflows and copy this workflow to your `.github/workflows/` folder. In this mode KiBot will detect the project files, create a configuration and generate the targets.
|
|
This workflow collects the generated files in `Automatic_outputs.zip`.
|
|
|
|
Examples of how to use KiBot can be found [here for GitHub](https://github.com/INTI-CMNB/kicad_ci_test) and [here for GitLab](https://gitlab.com/set-soft/kicad-ci-test).
|
|
|
|
In order to run KiBot on these environments you need a lot of software installed. The usual mechanism to achieve this is using [docker](https://www.docker.com/).
|
|
Docker images containing KiBot, all the supporting scripts and a corresponding KiCad can be found in the
|
|
[kicad5_auto](https://github.com/INTI-CMNB/kicad_auto/pkgs/container/kicad5_auto),
|
|
[kicad6_auto](https://github.com/INTI-CMNB/kicad_auto/pkgs/container/kicad6_auto) and
|
|
[kicad7_auto](https://github.com/INTI-CMNB/kicad_auto/pkgs/container/kicad7_auto) GitHub packages.
|
|
More complete images, with Pandoc, LaTeX, Blender and testing tools, can be found in the following packages:
|
|
[kicad5_auto_full](https://github.com/INTI-CMNB/kicad_auto/pkgs/container/kicad5_auto_full),
|
|
[kicad6_auto_full](https://github.com/INTI-CMNB/kicad_auto/pkgs/container/kicad6_auto_full) and
|
|
[kicad7_auto_full](https://github.com/INTI-CMNB/kicad_auto/pkgs/container/kicad7_auto_full) GitHub packages.
|
|
Old images can be found at [Docker Hub](https://hub.docker.com/) as
|
|
[setsoft/kicad_auto](https://hub.docker.com/repository/docker/setsoft/kicad_auto) and
|
|
[setsoft/kicad_auto_test](https://hub.docker.com/repository/docker/setsoft/kicad_auto_test).
|
|
|
|
The images are based on
|
|
[kicad5_debian](https://github.com/INTI-CMNB/kicad_debian/pkgs/container/kicad5_debian),
|
|
[kicad6_debian](https://github.com/INTI-CMNB/kicad_auto/pkgs/container/kicad6_debian) and
|
|
[kicad7_debian](https://github.com/INTI-CMNB/kicad_auto/pkgs/container/kicad7_debian).
|
|
([setsoft/kicad_debian](https://hub.docker.com/repository/docker/setsoft/kicad_debian) on Docker Hub),
|
|
containing KiCad on Debian GNU/Linux.
|
|
|
|
If you need to run the current development version of KiBot you can use the following docker images:
|
|
[ghcr.io/inti-cmnb/kicad5_auto_full:dev](https://github.com/INTI-CMNB/kicad_auto/pkgs/container/kicad5_auto_full),
|
|
[ghcr.io/inti-cmnb/kicad6_auto_full:dev](https://github.com/INTI-CMNB/kicad_auto/pkgs/container/kicad6_auto_full) or
|
|
[ghcr.io/inti-cmnb/kicad7_auto_full:dev](https://github.com/INTI-CMNB/kicad_auto/pkgs/container/kicad7_auto_full)
|
|
([setsoft/kicad_auto:dev](https://hub.docker.com/repository/docker/setsoft/kicad_auto)).
|
|
These images are based on the *full* (also named *test*) images.
|
|
|
|
The most important images are:
|
|
|
|
| Name | KiBot | KiCad |
|
|
| :---------------------------------------- | ------------ | -----: |
|
|
| ghcr.io/inti-cmnb/kicad5_auto_full:latest | last release | 5.1.9 |
|
|
| ghcr.io/inti-cmnb/kicad6_auto_full:latest | last release | 6.x |
|
|
| ghcr.io/inti-cmnb/kicad7_auto_full:latest | last release | 7.x |
|
|
| ghcr.io/inti-cmnb/kicad5_auto:latest | last release | 5.1.9 |
|
|
| ghcr.io/inti-cmnb/kicad6_auto:latest | last release | 6.x |
|
|
| ghcr.io/inti-cmnb/kicad7_auto:latest | last release | 7.x |
|
|
| ghcr.io/inti-cmnb/kicad5_auto_full:dev | git code | 5.1.9 |
|
|
| ghcr.io/inti-cmnb/kicad6_auto_full:dev | git code | 6.x |
|
|
| ghcr.io/inti-cmnb/kicad7_auto_full:dev | git code | 7.x |
|
|
| ghcr.io/inti-cmnb/kicad5_auto_full:1.6.0 | 1.6.0 | 5.1.9 |
|
|
| ghcr.io/inti-cmnb/kicad6_auto_full:1.6.0 | 1.6.0 | 6.0.10 |
|
|
| ghcr.io/inti-cmnb/kicad5_auto_full:1.5.1 | 1.5.1 | 5.1.9 |
|
|
| ghcr.io/inti-cmnb/kicad6_auto_full:1.5.1 | 1.5.1 | 6.0.10 |
|
|
| ghcr.io/inti-cmnb/kicad5_auto_full:1.4.0 | 1.4.0 | 5.1.9 |
|
|
| ghcr.io/inti-cmnb/kicad6_auto_full:1.4.0 | 1.4.0 | 6.0.9 |
|
|
| ghcr.io/inti-cmnb/kicad5_auto_full:1.3.0 | 1.3.0 | 5.1.9 |
|
|
| ghcr.io/inti-cmnb/kicad6_auto_full:1.3.0 | 1.3.0 | 6.0.7 |
|
|
| ghcr.io/inti-cmnb/kicad5_auto:1.2.0 | 1.2.0 | 5.1.9 |
|
|
| ghcr.io/inti-cmnb/kicad6_auto:1.2.0 | 1.2.0 | 6.0.5 |
|
|
|
|
For more information about the docker images visit [kicad_debian](https://github.com/INTI-CMNB/kicad_debian) and [kicad_auto](https://github.com/INTI-CMNB/kicad_auto).
|
|
|
|
|
|
### Usage of GitHub Actions
|
|
|
|
Note: You can also use --quick-start functionality with GitHub actions, an example is this
|
|
[workflow](https://github.com/INTI-CMNB/kibot_variants_arduprog/blob/master/.github/workflows/kibot_action_quick_start.yml).
|
|
This is the fastest way to test KiBot functionality.
|
|
|
|
You need to put a [config.kibot.yaml](#configuration) file into the KiCad project folder.
|
|
|
|
Here is an example of workflow file using the GitHub Action:
|
|
|
|
```yaml
|
|
name: example
|
|
|
|
on:
|
|
push:
|
|
paths:
|
|
- '**.sch'
|
|
- '**.kicad_pcb'
|
|
pull_request:
|
|
paths:
|
|
- '**.sch'
|
|
- '**.kicad_pcb'
|
|
|
|
jobs:
|
|
example:
|
|
runs-on: ubuntu-latest
|
|
steps:
|
|
- uses: actions/checkout@v2
|
|
- uses: INTI-CMNB/KiBot@v2
|
|
with:
|
|
# Required - kibot config file
|
|
config: config.kibot.yaml
|
|
# optional - prefix to output defined in config
|
|
dir: output
|
|
# optional - schematic file
|
|
schema: 'schematic.sch'
|
|
# optional - PCB design file
|
|
board: 'pcb.kicad_pcb'
|
|
- name: upload results
|
|
uses: actions/upload-artifact@v2
|
|
with:
|
|
name: output
|
|
path: output
|
|
```
|
|
|
|
For KiCad 6 use `v2_k6` instead of `v2` (`v2_k7` for KiCad 7).
|
|
These actions use the last KiBot stable release, to use the current development code use `v2_dk6` (KiCad 6) and `v2_d` (KiCad 5).
|
|
|
|
A working example applied to a repo can be found [here](https://github.com/INTI-CMNB/kicad-ci-test-spora/tree/test_gh_action)
|
|
([spora_main.yml](https://github.com/INTI-CMNB/kicad-ci-test-spora/blob/test_gh_action/.github/workflows/spora_main.yml)).
|
|
Another example, but using variants can be found [here](https://github.com/INTI-CMNB/kibot_variants_arduprog)
|
|
([kibot_action.yml](https://github.com/INTI-CMNB/kibot_variants_arduprog/blob/master/.github/workflows/kibot_action.yml) for KiCad 6,
|
|
[kibot_action.yml](https://github.com/INTI-CMNB/kibot_variants_arduprog/blob/KiCad5/.github/workflows/kibot_action.yml) for KiCad 5)
|
|
|
|
The available options are:
|
|
|
|
- **additional_args**: Additional text to add to the KiBot invocation. This is intended for advanced use, report problems.
|
|
- **cache3D**: When `YES` you can cache the downloaded 3D models. An example can be found [here](https://github.com/set-soft/kibot_3d_models_cache_example/).
|
|
- **config**: The KiBot config file to use. The first file that matches `*.kibot.yaml` is used when omitted.
|
|
- **dir**: Output directory for the generated files. The current directory is used when omitted.
|
|
- **board**: Name of the PCB file. The first file that matches `*.kicad_pcb` is used when omitted.
|
|
- **install3D**: When `YES` installs the KiCad 3D models. Note that this will download more than 360 MiB and install more than 5 GiB of files.
|
|
- **quickstart**: When `YES` ignores all the other options and runs in `--quick-start` mode. No configuration needed.
|
|
- **schema**: Name of the schematic file. The first file that matches `*.*sch` is used when omitted.
|
|
- **skip**: Skip preflights, comma separated or *all*. Nothing is skipped when omitted.
|
|
- **targets**: List of targets to generate separated by spaces. To only run preflights use __NONE__. All targets are generated when omitted.
|
|
- **variant**: Global variant to use. No variant is applied when omitted.
|
|
- **verbose**: Level of verbosity. Valid values are 0, 1, 2 or 3. Default is 0.
|
|
|
|
#### GitHub Actions tags
|
|
|
|
There are several tags you can choose:
|
|
|
|
| Tag | API | KiBot | KiCad |
|
|
| :---------- | --- | ------------ | ----: |
|
|
| v1 | 1 | 1.2.0 | 5.1.9 |
|
|
| v1_k6 | 1 | 1.2.0 | 6.0.5 |
|
|
| v2_1_2_0 | 2 | 1.2.0 | 5.1.9 |
|
|
| v2_k6_1_2_0 | 2 | 1.2.0 | 6.0.5 |
|
|
| v2_1_3_0 | 2 | 1.3.0 | 5.1.9 |
|
|
| v2_k6_1_3_0 | 2 | 1.3.0 | 6.0.7 |
|
|
| v2_1_4_0 | 2 | 1.4.0 | 5.1.9 |
|
|
| v2_k6_1_4_0 | 2 | 1.4.0 | 6.0.9 |
|
|
| v2_1_5_1 | 2 | 1.5.1 | 5.1.9 |
|
|
| v2_k6_1_5_1 | 2 | 1.5.1 | 6.0.9 |
|
|
| v2_1_6_0 | 2 | 1.6.0 | 5.1.9 |
|
|
| v2_k6_1_6_0 | 2 | 1.6.0 | 6.0.9 |
|
|
| v2 | 2 | last release | 5.1.9 |
|
|
| v2_k6 | 2 | last release | 6.x |
|
|
| v2_k7 | 2 | last release | 7.x |
|
|
| v2_d | 2 | git code | 5.1.9 |
|
|
| v2_dk6 | 2 | git code | 6.x |
|
|
| v2_dk7 | 2 | git code | 7.x |
|
|
|
|
The main differences between API 1 and 2 are:
|
|
|
|
- API 2 adds support for variants and quick-start
|
|
- In API 2 you can select which targets are created
|
|
- In API 1 you must specify the input files, in API 2 can be omitted
|
|
- API 1 supports wildcards in the filenames, API 2 doesn't
|
|
- API 2 supports spaces in the filenames, API 1 doesn't
|
|
|
|
Also note that v2 images are currently using the *full* docker image (v1.5 and newer).
|
|
It includes things like PanDoc and Blender.
|
|
|
|
### GitHub Cache
|
|
|
|
GitHub offers a mechanism to cache data between runs.
|
|
One interesting use is to make the KiCost prices cache persistent, here is an [example](https://github.com/set-soft/kicost_ci_test)
|
|
|
|
Another use is to cache [downloaded 3D models](https://github.com/set-soft/kibot_3d_models_cache_example)
|
|
|
|
|
|
## Contributing
|
|
|
|
If you find KiBot useful please consider contributing to the project. There various ways to contribute.
|
|
Of course donations are welcome ([donate](https://www.paypal.com/donate/?hosted_button_id=K2T86GDTTMRPL)), but there are other ways to contribute:
|
|
|
|
- In general:
|
|
- Your workflow: What's missing in KiBot for your workflow? Comment it in the
|
|
[discussions](https://github.com/INTI-CMNB/KiBot/discussions/categories/missing-in-my-workflow)
|
|
- Configuration for a manufacturer: If you have a configuration known to work for a manufacturer please consider contributing it.
|
|
Even if this is a small manufacurer, this helps to know what are the most common options.
|
|
- Mention KiBot: If your project or company uses KiBot you can mention it, so people know about KiBot.
|
|
Also if you are reporting a KiCad issue, currently KiCad developers doesn't pay much attention to automation details.
|
|
- If you are a Windows/Mac OS X user:
|
|
- If you managed to run it locally consider contributing a tutorial of how to do it.
|
|
- If you run KiBot on CI/CD and want to run it locally: consider investing some time on tests.
|
|
Just comment in the [discussions](https://github.com/INTI-CMNB/KiBot/discussions/categories/other-platforms)
|
|
and I'll help you to run tests to adapt the code.
|
|
Now that KiCad 6 uses Python 3 most of KiBot functionality should work on Windows and Mac OS X.
|
|
People is using WSL to run KiBot, but we don't have a tutorial about how to do it.
|
|
- If you use a Linux that isn't derived from Debian:
|
|
- Consider helping to add better support for it. Do you know the name of the packages for the dependencies?
|
|
Do you know how to create a package for your distro?
|
|
- If you are good writing tutorials:
|
|
- Consider writing some tutorial about using KiBot. Some examples:
|
|
- How to start using it
|
|
- How to use filters/variants
|
|
- How to create good BoMs
|
|
- If you know Python:
|
|
- Create a new output: KiBot is modular, creating a new output can be done just using some of the `kibot/out_*` files as template.
|
|
The outputs works as plugins and they are automatically discovered by KiBot. Note that you can add them to `~/.config/kibot/plugins`
|
|
- Add regression tests: If you know about Python testing you can add tests to `tests/test_plot/`. We try to cover 100% of the code.
|
|
Even simple tests that check the code executes are welcome.
|
|
- If you know HTML/CSS:
|
|
- Internal BoM styles: You can just take a look at the generated HTMLs and contribute a CSS, or take a look at the code
|
|
(`kibot/bom/html_writer.py`) and add more functionality.
|
|
- Navigate results styles: Similar to the above but for the `navigate_results` output (`kibot/out_navigate_results.py`).
|
|
- If you have drawing skills:
|
|
- Navigate results icons: Currently we have only one set of icons, they are from KiCad 6. Alternative icons are welcome.
|
|
|
|
|
|
## Notes about Gerber format
|
|
|
|
I found this topic poorly documented and quite complex. So here is what I know, feel free to send me any corrections.
|
|
Note that this is a very dynamic topic and this text was written in november 2020.
|
|
|
|
The gerber format is controlled by [Ucamco](https://www.ucamco.com/en/), a leading manufacturer of equipment and software for PCB fabrication.
|
|
Even when this isn't an open standard they release the spec for free and interact with Jean-Pierre Charras (father of KiCad).
|
|
So KiCad support for gerber format is really updated.
|
|
|
|
The gerber format evolved with time, here are the versions I know:
|
|
|
|
* **RS-274D** obsolete version of the format.
|
|
* **RS-274X** (aka **X1**) this is the *extended* version of the format. Is the most widely supported, but has some limitations.
|
|
* **X2** this is the format currently recommended by Ucamco and the default for modern KiCad versions.
|
|
This extension adds important meta-data to the files. It helps CAM operators to know what's every drawing in the image.
|
|
So you know which are pads, tracks, etc. And also more interesting information: impedance controlled tracks, the role of each file, etc.
|
|
Using X2 you can know what is each file without the need of special names or file extensions.
|
|
KiCad can generate drill files using X2.
|
|
* **X3** this is the current draft. One interesting addition is the *Components* role.
|
|
These files replaces the position files, adding important information about the footprint.
|
|
|
|
In addition to them is the spec for the **Gerber Job** file. This file was introduced between X2 and X3, and is used to group all the gerber files.
|
|
The *gbrjob* file contains all the missing stack-up information.
|
|
|
|
KiCad 5 can generate X1, X2 and gerber job files, including drill information in gerber format.
|
|
KiCad 5.99 (6.0 pre-release) can also generate X3 files (position files in gerber format).
|
|
|
|
As you can see the idea of Ucamco is to unify all fabrication information in one format.
|
|
|
|
The **X2** format was designed in a way that software that fully implement **X1** can just ignore the added meta-data.
|
|
In an ideal world you shouldn't bother about it and generate **X2** files. Just use the **gbr** file extension and a *gbrjob* file.
|
|
The problem is with poorly implemented CAM tools. In particular **CAM350**, used by various important cheap China manufacturers.
|
|
This software has known issues interpretating aperture macros and some X2 data.
|
|
If your manufacturer has problems with your files check the following:
|
|
|
|
* Put gerber, drill and position files in the same directory.
|
|
* Disable **X2** extensions (`use_gerber_x2_attributes` set to `false`)
|
|
* Use arcaic role mechanism (`use_protel_extensions` set to `true`)
|
|
* Disable **aperture macros** (KiCad 6 only: `disable_aperture_macros` set to `true`)
|
|
|
|
The [kicad-gerberzipper](https://github.com/g200kg/kicad-gerberzipper) is an action plugin for KiCad oriented to help to generate gerber and drill files for some manufacturers.
|
|
I adapted the configurations from kicad-gerberzipper to KiBot configurations, they are available as [internal templates](#importing-internal-templates).
|
|
|
|
|
|
## Notes about the position file
|
|
|
|
Position files are quite simple. You can generate them as plain text (ASCII) or as a spreadsheet (CSV).
|
|
|
|
But some conventions can make them tricky. Some manufacturers, like [JLCPCB](https://jlcpcb.com/), uses conventions that are incompatible with KiCad.
|
|
|
|
The [following blog](https://dubiouscreations.com/2019/10/21/using-kicad-with-jlcpcb-assembly-service/) explains how to adapt the position files generated by KiCad to what JLCPCB needs.
|
|
To achieve it the author uses a script called [JLCKicadTools](https://github.com/matthewlai/JLCKicadTools).
|
|
|
|
You can achieve the same using KiBot. Here is a configuration example that generates the BoM and position files in the same way JLCKicadTools does:
|
|
|
|
```yaml
|
|
kibot:
|
|
version: 1
|
|
|
|
filters:
|
|
- name: only_jlc_parts
|
|
comment: 'Only parts with JLC code'
|
|
type: generic
|
|
include_only:
|
|
- column: 'LCSC#'
|
|
regex: '^C\d+'
|
|
|
|
variants:
|
|
- name: rotated
|
|
comment: 'Just a place holder for the rotation filter'
|
|
type: kibom
|
|
variant: rotated
|
|
pre_transform: _rot_footprint
|
|
|
|
outputs:
|
|
- name: 'position'
|
|
comment: "Pick and place file, JLC style"
|
|
type: position
|
|
options:
|
|
variant: rotated
|
|
output: '%f_cpl_jlc.%x'
|
|
format: CSV
|
|
units: millimeters
|
|
separate_files_for_front_and_back: false
|
|
only_smd: true
|
|
columns:
|
|
- id: Ref
|
|
name: Designator
|
|
- Val
|
|
- Package
|
|
- id: PosX
|
|
name: "Mid X"
|
|
- id: PosY
|
|
name: "Mid Y"
|
|
- id: Rot
|
|
name: Rotation
|
|
- id: Side
|
|
name: Layer
|
|
|
|
- name: 'bom'
|
|
comment: "BoM for JLC"
|
|
type: bom
|
|
options:
|
|
output: '%f_%i_jlc.%x'
|
|
exclude_filter: 'only_jlc_parts'
|
|
ref_separator: ','
|
|
columns:
|
|
- field: Value
|
|
name: Comment
|
|
- field: References
|
|
name: Designator
|
|
- Footprint
|
|
- field: 'LCSC#'
|
|
name: 'LCSC Part #'
|
|
csv:
|
|
hide_pcb_info: true
|
|
hide_stats_info: true
|
|
quote_all: true
|
|
```
|
|
|
|
The `only_jlc_parts` filter is used to generate the BoM and assumes you put the JLC component code in a field named `LCSC#` (JLC uses [LCSC](https://lcsc.com/) as supplier).
|
|
Note that the author of the blog simply used `Field4` for this and his script searches for any field containing the `^C\d+` pattern.
|
|
I think this isn't a good idea and I suggest using a defined name, like in this example.
|
|
|
|
The `rotated` variant is used only to apply the `_rot_footprint` transformation filter. This filter is an internal filter of type `rot_footprint`.
|
|
Here is the same configuration file making explicit use of the rotation filter:
|
|
|
|
```yaml
|
|
kibot:
|
|
version: 1
|
|
|
|
filters:
|
|
- name: fix_rotation
|
|
comment: 'Adjust rotation for JLC'
|
|
type: rot_footprint
|
|
|
|
- name: only_jlc_parts
|
|
comment: 'Only parts with JLC code'
|
|
type: generic
|
|
include_only:
|
|
- column: 'LCSC#'
|
|
regex: '^C\d+'
|
|
|
|
variants:
|
|
- name: rotated
|
|
comment: 'Just a place holder for the rotation filter'
|
|
type: kibom
|
|
variant: rotated
|
|
pre_transform: fix_rotation
|
|
|
|
outputs:
|
|
- name: 'position'
|
|
comment: "Pick and place file, JLC style"
|
|
type: position
|
|
options:
|
|
variant: rotated
|
|
output: '%f_cpl_jlc.%x'
|
|
format: CSV
|
|
units: millimeters
|
|
separate_files_for_front_and_back: false
|
|
only_smd: true
|
|
columns:
|
|
- id: Ref
|
|
name: Designator
|
|
- Val
|
|
- Package
|
|
- id: PosX
|
|
name: "Mid X"
|
|
- id: PosY
|
|
name: "Mid Y"
|
|
- id: Rot
|
|
name: Rotation
|
|
- id: Side
|
|
name: Layer
|
|
|
|
- name: 'bom'
|
|
comment: "BoM for JLC"
|
|
type: bom
|
|
options:
|
|
output: '%f_%i_jlc.%x'
|
|
exclude_filter: 'only_jlc_parts'
|
|
ref_separator: ','
|
|
columns:
|
|
- field: Value
|
|
name: Comment
|
|
- field: References
|
|
name: Designator
|
|
- Footprint
|
|
- field: 'LCSC#'
|
|
name: 'LCSC Part #'
|
|
csv:
|
|
hide_pcb_info: true
|
|
hide_stats_info: true
|
|
quote_all: true
|
|
```
|
|
|
|
As you can see we now create a filter named `fix_rotation` of type `rot_footprint`:
|
|
|
|
```yaml
|
|
- name: fix_rotation
|
|
comment: 'Adjust rotation for JLC'
|
|
type: rot_footprint
|
|
```
|
|
|
|
Using it, instead of the internal filter named `_rot_footprint`, is the same here. But you can then customize the filter.
|
|
|
|
The filter supports the following options:
|
|
|
|
- `extend`: [boolean=true] Extends the internal list of rotations with the one provided. Otherwise just use the provided list.
|
|
- `negative_bottom`: [boolean=true] Rotation for bottom components is computed via subtraction as `(component rot - angle)`. Note that this should be coherent with the `bottom_negative_x` of the position output.
|
|
- `invert_bottom`: [boolean=false] Rotation for bottom components is negated, resulting in either: `(- component rot - angle)` or when combined with `negative_bottom`, `(angle - component rot)`.
|
|
- `rotations`: [list(list(string))] A list of pairs regular expression/rotation. Components matching the regular expression will be rotated the indicated angle. Special names `_top` and `_bottom` will match all components on that side of the board.
|
|
|
|
In order to add a new rotation or just change an existing one you just need to use the `rotations` option.
|
|
As an example: the internal list of rotations rotates QFN packages by 270 degrees, no suppose you want to rotate them just 90 degrees.
|
|
The filter will look like this:
|
|
|
|
```yaml
|
|
- name: fix_rotation
|
|
comment: 'Adjust rotation for JLC'
|
|
type: rot_footprint
|
|
rotations:
|
|
- ["^QFN-", 90.0]
|
|
```
|
|
|
|
This regular expression will match any footprint starting with `QFN-` and rotate it 90 degrees.
|
|
|
|
The internal list of rotations is:
|
|
|
|
| Footprint | Rotation |
|
|
| :-------------------------------------------------- | -------: |
|
|
|`^Bosch_LGA-8_2x2.5mm_P0.65mm_ClockwisePinNumbering` | 90.0 |
|
|
|`^R_Array_Convex_` | 90.0 |
|
|
|`^R_Array_Concave_` | 90.0 |
|
|
|`^SOT-223` | 180.0 |
|
|
|`^SOT-23` | 180.0 |
|
|
|`^TSOT-23` | 180.0 |
|
|
|`^SOT-353` | 180.0 |
|
|
|`^QFN-` | 270.0 |
|
|
|`^LQFP-` | 270.0 |
|
|
|`^TQFP-` | 270.0 |
|
|
|`^SOP-(?!18_)` | 270.0 |
|
|
|`^TSSOP-` | 270.0 |
|
|
|`^DFN-` | 270.0 |
|
|
|`^SOIC-` | 270.0 |
|
|
|`^VSSOP-10_` | 270.0 |
|
|
|`^CP_EIA-3216-18_` | 180.0 |
|
|
|`^CP_EIA-3528-15_AVX-H` | 180.0 |
|
|
|`^CP_EIA-3528-21_Kemet-B` | 180.0 |
|
|
|`^CP_Elec_8x10.5` | 180.0 |
|
|
|`^CP_Elec_6.3x7.7` | 180.0 |
|
|
|`^CP_Elec_8x6.7` | 180.0 |
|
|
|`^CP_Elec_8x10` | 180.0 |
|
|
|`^(.*?_\|V)?QFN-(16\|20\|24\|28\|40)(-\|_\|$)` | 270.0 |
|
|
|`^PowerPAK_SO-8_Single` | 270.0 |
|
|
|`^HTSSOP-28-1EP_4.4x9.7mm*` | 270.0 |
|
|
|
|
### XYRS files
|
|
|
|
XYRS files are just BoM files in CSV format that includes pick and place data (**X** position, **Y** position, **R**otation and **S**ide).
|
|
You can generate them using the internal BoM generator (`bom` output).
|
|
The following fields contains the needed information:
|
|
|
|
- `Footprint X`
|
|
- `Footprint Y`
|
|
- `Footprint Rot`
|
|
- `Footprint Side`
|
|
|
|
Additionally we support:
|
|
|
|
- `Footprint Type` (SMD, THT, VIRTUAL)
|
|
- `Footprint X-Size`
|
|
- `Footprint Y-Size`
|
|
- `Footprint Populate`
|
|
|
|
Important: These files doesn't support manual panelization with repeated reference names, you'll get the coordinates for just one component because this is a BoM.
|
|
|
|
## Notes about 3D models
|
|
|
|
This section contains some notes and advices about the use of 3D models.
|
|
There are many strategies and you can choose the mix that better suits your needs.
|
|
If you have any suggestion don't hesitate in contacting me to add them.
|
|
|
|
### 3D models and docker images
|
|
|
|
The default KiCad 3D models aren't included in the KiBot docker images.
|
|
This is because the 3D models currently needs around 5 GB and the current docker images are between 1 and 2.8 GB.
|
|
So adding them means a huge increase in size.
|
|
|
|
This is not a big problem because KiBot will download any missing 3D model from KiCad's repo.
|
|
|
|
As a side effect you'll get errors and/or warnings about the missing 3D models and/or KiCad environment variables pointing to them.
|
|
|
|
If you need to install the KiCad 3D models in one of the `kicad_debian`, `kicad_auto` or `kicad_auto_test` images just run the
|
|
`/usr/bin/kicad_3d_install.sh` script included with the current images.
|
|
|
|
If you are running the GitHub action and you want to install the KiCad 3D models use the `install3D: YES` option.
|
|
|
|
### Caching downloaded 3D models
|
|
|
|
You can store the downloaded 3D models in a GitHub cache, an example can be found in the following
|
|
[repo](https://github.com/set-soft/kibot_3d_models_cache_example)
|
|
|
|
### Self contained projects
|
|
|
|
Try to make your project self contained.
|
|
If you are using a repo this means the repo should contain anything needed to work with your project.
|
|
|
|
KiCad 6 helps a lot in this regard. Now schematic files are self contained, you don't need external files to work with them.
|
|
Even with this I think including the used symbols and footprints isn't a bad idea.
|
|
If you expect other people to edit your project then is much simpler if the originals are in the project.
|
|
|
|
The 3D models are a very special case. KiCad doesn't help much in this regard.
|
|
I strongly suggest including all used 3D models in your repo.
|
|
You can then use `${KIPRJMOD}` as base for the path to the models, this will be expanded to the current path to your project.
|
|
So you can use things like `${KIPRJMOD}/3D/MODEL_NAME` and store all the 3D models in the *3D* folder inside your project folder.
|
|
|
|
### LCSC/JLCPCB/EasyEDA 3D models
|
|
|
|
KiBot can download 3D models for components that has an LCSC code and that has a 3D model at [EasyEDA](https://easyeda.com/).
|
|
If the 3D model is used locally, but not found in the repo, KiBot will try to download it.
|
|
Use the `field_lcsc_part` option if KiBot fails to detect the schematic field containing the LCSC code.
|
|
|
|
### 3D models aliases
|
|
|
|
This is a KiCad 6 feature that was removed in KiCad 7. If you use it please migrate to environment variables as KiCad 7 did.
|
|
If you still interested on it continue reading.
|
|
|
|
This is a very limited feature in KiCad. You can define an `ALIAS` and then use `ALIAS:MODEL_NAME`.
|
|
The `ALIAS` will say where to look for `MODEL_NAME`. This looks coherent with the way KiCad handles symbols and footprints.
|
|
But it currently has a huge limitation: this information is stored along with the user configuration and there is no way to
|
|
complement it at project level. I don't recommend using aliases because it makes quite complicated to create self contained
|
|
projects.
|
|
|
|
KiBot offers some mechanisms to help using aliases:
|
|
|
|
1. You can define your aliases in the `global` section using the `aliases_for_3d_models` option.
|
|
2. You can use environment and text variables to define aliases. This can be disabled using the `disable_3d_alias_as_env` option.
|
|
|
|
The problem with this is that you must keep two lists synchronized, one for KiCad and the other to make your project self contained.
|
|
|
|
### How to handle addons
|
|
|
|
KiCad 6 introduces a *Plugin and Content Manager*, they can contain footprints and 3D models.
|
|
Using 3D models aliases looks like a good solution here, but this isn't.
|
|
The best solution here is to use the `KICAD6_3RD_PARTY` variable.
|
|
Instead of defining an alias pointing to the content you can just use `${KICAD6_3RD_PARTY}/3dmodels/FULL_PLUGIN_NAME/MODEL_NAME`.
|
|
I know this is long, but this will make your project portable.
|
|
The user will need to download the plugin, but won't need to define any alias.
|
|
|
|
### Getting a self contained PCB
|
|
|
|
In order to help users to create self contained projects KiBot offers some help.
|
|
The following configuration:
|
|
|
|
```yaml
|
|
# Example KiBot config file
|
|
kibot:
|
|
version: 1
|
|
|
|
outputs:
|
|
- name: export_pcb
|
|
comment: 'Copy 3D models'
|
|
type: copy_files
|
|
dir: 'expoted_pcb'
|
|
options:
|
|
files:
|
|
- source_type: 3d_models
|
|
dest: 3d_models+
|
|
save_pcb: true
|
|
```
|
|
|
|
Will create a new PCB inside a directory called `expoted_pcb`, this PCB will use the 3D models copied to `expoted_pcb/3d_models` using
|
|
relative paths. So you can move the new PCB file to any place, as long as the `3d_models` directory is in the same place as the PCB.
|
|
|
|
## Proposed advanced KiCad usage
|
|
|
|
This section contains some proposed solutions for special, or advanced, KiCad usage.
|
|
|
|
### One circuit and more than one PCB implementation
|
|
|
|
Use hierarchical pages to share the circuit between two projects: [example](docs/1_SCH_2_diff_PCBs)
|
|
|
|
### System with more than one PCB
|
|
|
|
This case is [discussed here](docs/1_SCH_2_part_PCBs)
|
|
|
|
## Credits
|
|
|
|
- **KiBot project**: Salvador E. Tropea (@set-soft)
|
|
- **Original KiPlot project**: John Beard (@johnbeard)
|
|
- **Original KiCad Automation Scripts**: Scott Bezek, Productize SPRL
|
|
- **KiBoM**: Oliver Henry Walters (@SchrodingersGat)
|
|
- **Interactive HTML BoM**: @qu1ck
|
|
- **PcbDraw/Populate/KiKit**: Jan Mrázek (@yaqwsx)
|
|
- **KiCost**: Dave Vandenbout (@devbisme) and Hildo Guillardi Júnior (@hildogjr)
|
|
- **KiCAD to Boardview exporter**: @whitequark
|
|
- **S-expression parser**: Takafumi Arakaki
|
|
- **Python macros**: Juha Jeronen (@Technologicat)
|
|
- **Board2Pdf**: Albin Dennevi
|
|
- **PyPDF2**: Mathieu Fenniak
|
|
- **svgutils**: Bartosz Telenczuk (@btel)
|
|
- **svgpathtools**: Andy A. Port
|
|
- **pybars**: Will Bond and Mjumbe Wawatu Ukweli (Canonical Ltd.)
|
|
- **pymeta**: Allen Short and Waldemar Kornewald
|
|
- **Contributors**:
|
|
- **Error filters ideas**: Leandro Heck (@leoheck)
|
|
- **GitHub Actions Integration/SVG output**: @nerdyscout
|
|
- **Plug-in loader fix**: Stavros Korokithakis (@skorokithakis)
|
|
- **SCH loader fix**: @Sabolik
|
|
- **SCH library loader fix**: Bernhard B. (@bbernhard)
|
|
- **GitHub Actions fix**: @TheSlowGrowth
|
|
- **Easier README navigation**: Robin Vobruba (@hoijui)
|
|
- **Typos corrections**: Seth Kaz (@sethkaz) and Sebastian Grau (@SebastianGrau)
|
|
- **Various tools suggested**: MDW (@mdeweerd)
|
|
- **Various tools suggested**: Chris Wilson (@cdwilson)
|
|
- **GENCAD export for KiAuto**: Theo Hussey (@flaminggoat)
|
|
- **Various fixes**: Henning Kleen (@hkleen)
|
|
- **SCH print all-pages option**: Kevin Dong (@kevin-dong-nai-jia)
|
|
- **Sources of inspiration and good ideas**:
|
|
- **JLC Kicad Tools**: Matthew Lai (@matthewlai)
|
|
- **KiCad Gerber Zipper**: @g200kg
|
|
- **pimpmykicadbom**: Anton Savov (@antto)
|
|
- **electro-grammar**: Kaspar Emanuel (@kasbah)
|
|
- **Others**:
|
|
- **Robot in the logo**: Christian Plaza (from pixabay)
|
|
- **Robot arm in assembly_simple.svg**: [Pixlok](https://pixlok.com/)
|
|
- **Chip in assembly_simple.svg**: [oNline Web Fonts](https://www.onlinewebfonts.com/)
|
|
- **Wrench**: [Freepik - Flaticon](https://www.flaticon.es/iconos-gratis/llave-inglesa)
|
|
- **Most icons for the navigate_results output**: The KiCad project
|
|
- **PTV09A 3D Model**: Dmitry Levin ([GrabCad](https://grabcad.com/dmitry.levin-6))
|
|
- **PcbDraw PCB example**: [Arduino Learning Kit Starter](https://github.com/RoboticsBrno/ArduinoLearningKitStarter)
|
|
- **Battery charger example**: [RB0002-BatteryPack](https://cadlab.io/project/22740/master/files)
|
|
- **IT-1187A 3D Model**: Anton Pavlov ([GrabCad](https://grabcad.com/anton.pavlov-2))
|
|
- **105017-0001 3D Model**: M.B.I. ([GrabCad](https://grabcad.com/m.b.i-1))
|
|
- **ASCII Art generated**: [patorjk](https://patorjk.com/)
|